WOODWORKING · DIY · A HANDMADE HOME @grainbyjoy
GRAIN by JoyWOODWORKING PLANS · WORKSHOP STORIES · HOME
FIND YOUR NEXT GOOD THING
WOODWORKING PLANPullout Bin Kitchen Island
WOODWORKING PLANFarmhouse Media Console
WOODWORKING PLANRound Coffee Table
WOODWORKING PLANGeometric Hairpin Coffee Table
WOODWORKING PLANHollow Panel Waterfall Console
WOODWORKING PLANFarmhouse Console Table
WOODWORKING PLANBarn Door Console
WOODWORKING PLANBeginner Farm Table
WOODWORKING PLANFarmhouse Coffee Table
FREE WOODWORKING PLAN
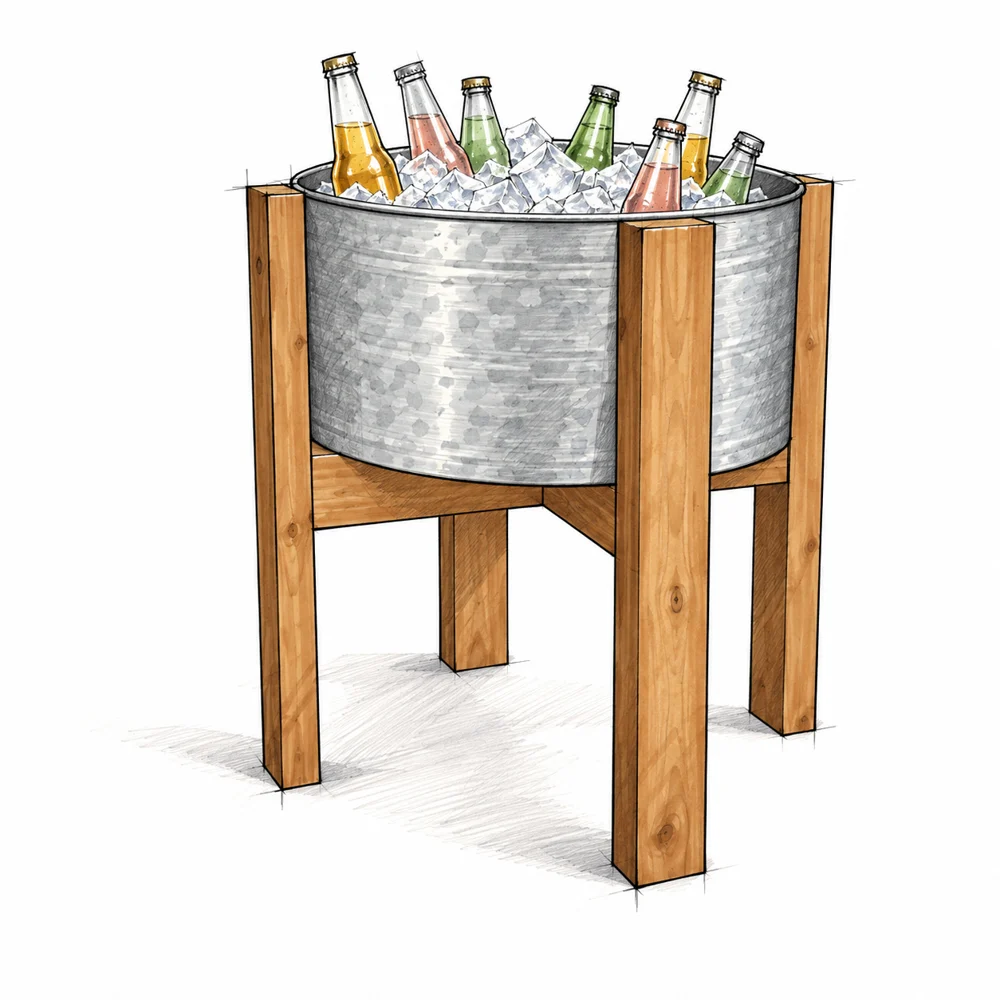
Outdoor / BEGINNER

Beverage Bucket Stand

A four-leg timber stand built around a round beverage tub.

FINISHED DIMENSIONS27 × 27 × 27 in
SKILL LEVELBeginner
WHAT IS INCLUDEDMaterials, cut list and illustrated steps
Read the free planMade this plan? Share your build
A GOOD BUILD STARTS WITH A CLEAR PLAN
  • Materials and tools
  • Cutting information and dimensions
  • Illustrated assembly steps
FROM THE FIRST CUT TO THE LAST DETAIL

Take it one step at a time

Everything you need to follow this build is written below. Read the materials, measurements and construction notes before your first cut.

Read the build steps

Yes. The complete plan is available to read on this page.
THE FREE BUILD GUIDE

Beverage Bucket Stand

A four-leg timber stand built around a round beverage tub.

BEFORE THE FIRST CUT

Materials

This version is sized for a 24 in (609.6 mm) round tub. Buy the tub first and confirm its fit before joining the legs.

QuantityMaterialSize or specification
2 boardsNominal 2×4 lumber8 ft / 96 in long 2438.4 mm
12 screwsPocket-hole screws OR self-tapping deck screws2 1/2 in / 63.5 mm OR 3 in / 76.2 mm Choose one method
1 tubRound galvanized beverage bucket24 in / 609.6 mm diameter 11 in / 279.4 mm deep as illustrated
As neededExterior wood glueFor the six wood joints

Surface preparation and finish

Have abrasives and a compatible exterior finish ready. Buy finish to its stated coverage; no fixed volume is specified. Filler is optional for visible holes.

Choose suitable materials

Use straight, dry lumber without splits or loose knots at the joints. Select fasteners compatible with the wood and outdoor exposure. Screw gauge is not specified; follow the screw and jig makers’ guidance.

WORKSHOP SETUP

Tools and safe preparation

Read both assembly stages before you cut. The pocket-hole method is the primary sequence; the deck-screw alternative is noted beside it.

Gather the tools

One tape measure, pencil, square, drill/driver and compound miter saw. For pocket joints, add one pocket-hole jig with its matched bit, stop collar and driver. Have clamps, a flat work surface, sanding tools and suitable pilot bits ready.

Protect yourself and the work

Wear eye and hearing protection. Use dust extraction and appropriate dust protection. Clamp and support stock before cutting or drilling. Follow each tool’s instructions and disconnect power before blade or bit adjustments.

Make a test joint first

For the pocket method, set the jig for 1 1/2 in (38.1 mm) thick material and set the drill collar as the jig maker directs. This is the material setting, not a request to drill a straight hole 1 1/2 in deep. Test on offcuts.

Plan screw access

The crosspieces stand on their narrow edges. Mark the faces used for pocket holes so the driver can reach them during assembly. Keep screw paths clear of adjacent screws and check that no tips will emerge.

Use the written dimensions

Sketches explain the parts and assembly; they are not full-size templates. Measure the actual boards and use one unit system throughout. Inch-to-millimeter conversions are rounded to 0.1 mm.

SEVEN PARTS FROM TWO BOARDS

Cut list

All ends are square cuts. Mark A, B and C on the parts, then compare matching pieces before assembly.

PartQtyStockLength inLength mmUse
A42×427685.8Legs
B12×424609.6Long crosspiece
C22×411 1/4285.8Short crosspieces

Nominal is not actual

A 2×4 is a lumber name. Typical dry, surfaced stock is 1 1/2 × 3 1/2 in (38.1 × 88.9 mm). Confirm your boards: the short-piece lengths assume a 1 1/2 in (38.1 mm) thick long crosspiece.

Suggested board allocation

Board 1: two A legs and one B crosspiece, totaling 78 in (1981.2 mm). Board 2: two A legs and two C crosspieces, totaling 76 1/2 in (1943.1 mm). Both totals exclude saw kerf and end trimming.

Cut accurately

Inspect each board and plan around defects. Square a sound reference end, measure each finished part from that end, and cut on the waste side of the line. Allow for blade width. Check the first leg before cutting the other three.

CHECK BEFORE FASTENING

Fit the tub to the frame

The tub sits on the cross, between four upright legs. Each leg is at the end of a cross arm, not at a corner of a square frame.

CheckInchesMillimeters
Support span on each cross axis24609.6
Outer footprint on each cross axis27685.8
Leg height27685.8
Illustrated tub diameter24609.6
Illustrated tub depth11279.4

Set the support height from the tub

For the illustrated 11 in (279.4 mm) deep tub, measure down that distance from each leg top to the top edge of the cross. The calculated support-top height is 27 - 11 = 16 in (406.4 mm) above the feet.

Dry-fit the real bucket

Rims, handles, taper and bases vary. Hold the unfilled tub in the dry-clamped frame: its base must bear on the cross without rocking or binding against the legs. Confirm the vertical position before fastening. Do not use a larger-diameter tub with this plan.

Cross-axis check: 11 1/4 + 1 1/2 + 11 1/4 = 24 in. The crosspieces stand on edge, with 3 1/2 in (88.9 mm) vertical.

STEP 01 / ASSEMBLY

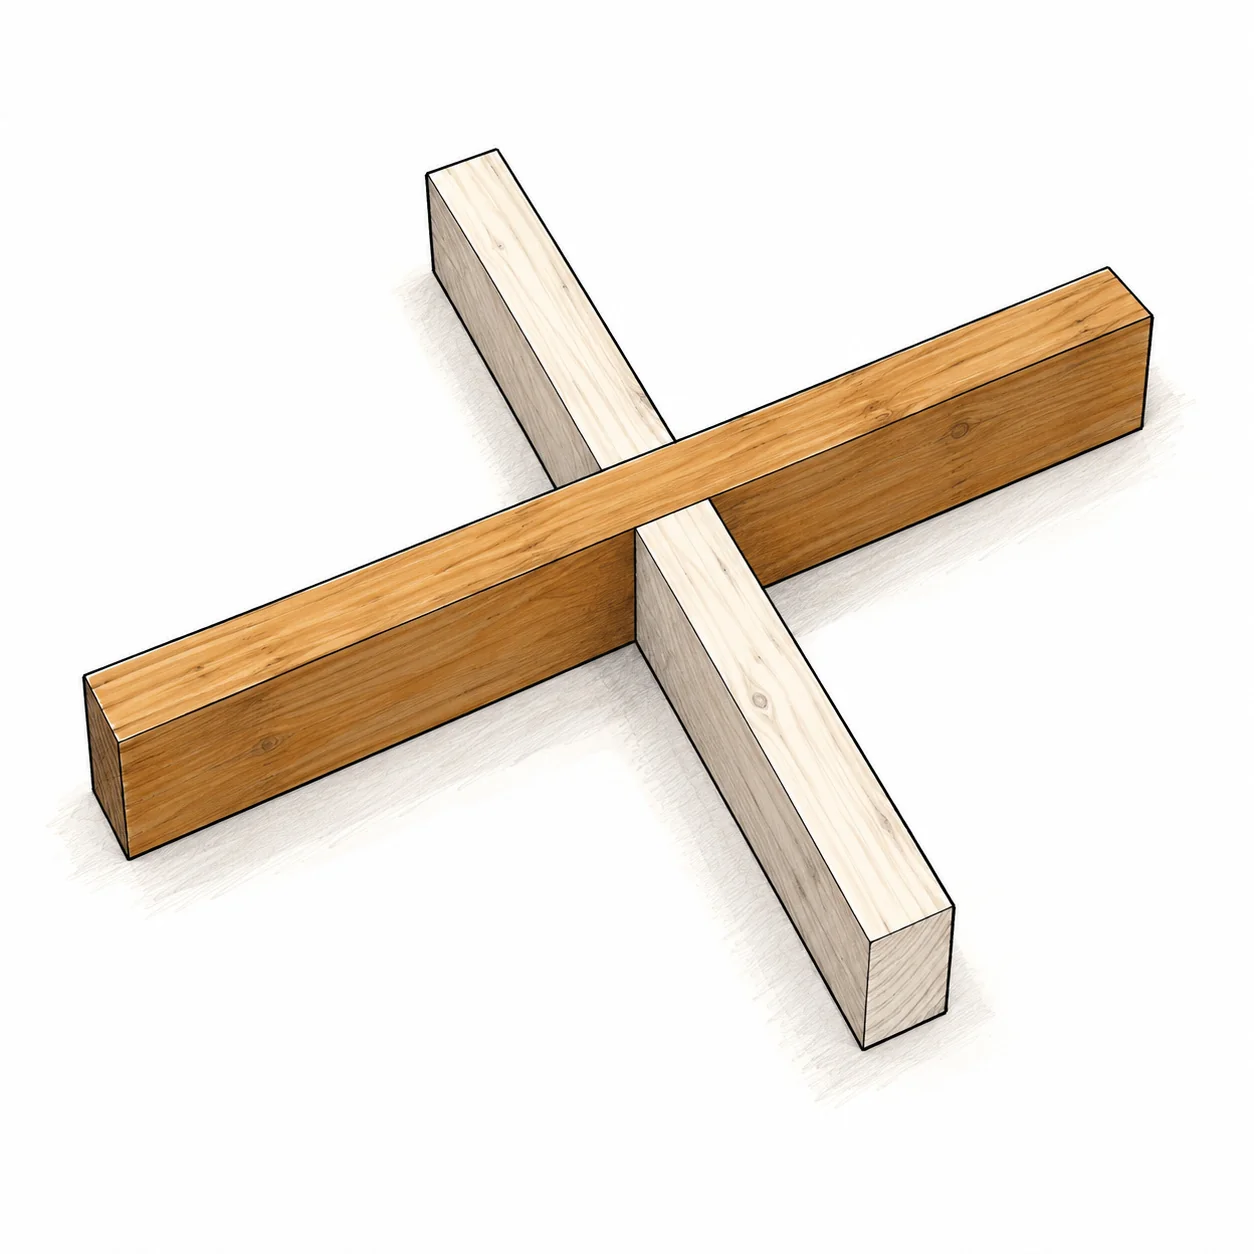
Build the cross support

B × 1 / C × 2 / Four screws at the two center joints

Build the cross support · Beverage Bucket Stand

Prepare and align

Drill two pocket holes at each end of all three crosspieces: 12 holes total. Stand them on edge. Butt one C against each broad face of B at its 12 in (304.8 mm) midpoint. Keep upper edges flush and arms square.

Glue and fasten the center

Dry-clamp and check the cross. Glue the two C-to-B joints and clamp. Drive two 2 1/2 in (63.5 mm) pocket screws per joint. Leave the eight outer holes for the legs. Do not overdrive.

Deck-screw alternative

Skip the pockets. Predrill as appropriate and drive 3 in (76.2 mm) self-tapping deck screws at an angle into the center joints. Check paths carefully to avoid splitting and screw collisions.

STEP 02 / ASSEMBLY

Attach the four legs

A × 4 / Completed cross / Eight screws at the leg joints

Attach the four legs · Beverage Bucket Stand

Mark and dry-clamp

Mark the selected support-top height on each broad inner leg face. Center each cross-arm end on its leg face. Dry-clamp all four legs at the same height, square to the cross, and check the empty tub fit.

Glue and fasten each joint

Glue and clamp each arm-to-leg joint. Use two 2 1/2 in (63.5 mm) pocket screws per leg. With the deck-screw method, drive 3 in (76.2 mm) screws from outside each leg into its crosspiece end.

Check before the glue cures

Stand the frame on a flat surface: all feet must touch, the cross must be level and the legs upright. Recheck the empty tub. Correct alignment before the glue sets, then let it cure as directed.

FINISH AND INSPECT

Ready for drinks

Finish the stand before putting it into service. The warm timber shown is a visual option, not a required color.

Smooth the wood

Check for splits and protruding screw tips. Ease sharp edges and sand with the grain. If filling visible holes, use filler compatible with the chosen finish. Remove dust thoroughly before coating.

Apply an exterior finish

Choose an exterior finish for the timber and exposure. Follow its preparation, ventilation, coat, drying and full-cure instructions. Remove glue residue before coating; it can prevent even staining.

Inspect the complete stand

After the glue and finish have cured, check every joint, all four feet and the tub’s contact with the cross. Place the stand on a firm, level surface. Stop using it if it rocks, splits, loosens or lets the tub shift.

Use cautiously

No tested load rating is provided. Ice, drinks and water add substantial weight; do not assume a full tub is safe. This is not a seat, step or climbing frame. Keep children from climbing or pulling on it, and empty the tub before moving the stand.

Care after use

Remove standing water, empty and dry the tub, and let the wood dry between uses. Store under cover when practical. Recheck fasteners, joints, feet and finish before each use; repair damage before loading.

MAKE IT YOURS

Measure your own stock and dry-fit before fastening. If you make this project, I would love to see what you built.

Share your build