WOODWORKING · DIY · A HANDMADE HOME @grainbyjoy
GRAIN by JoyWOODWORKING PLANS · WORKSHOP STORIES · HOME
FIND YOUR NEXT GOOD THING
WOODWORKING PLANPullout Bin Kitchen Island
WOODWORKING PLANFarmhouse Media Console
WOODWORKING PLANRound Coffee Table
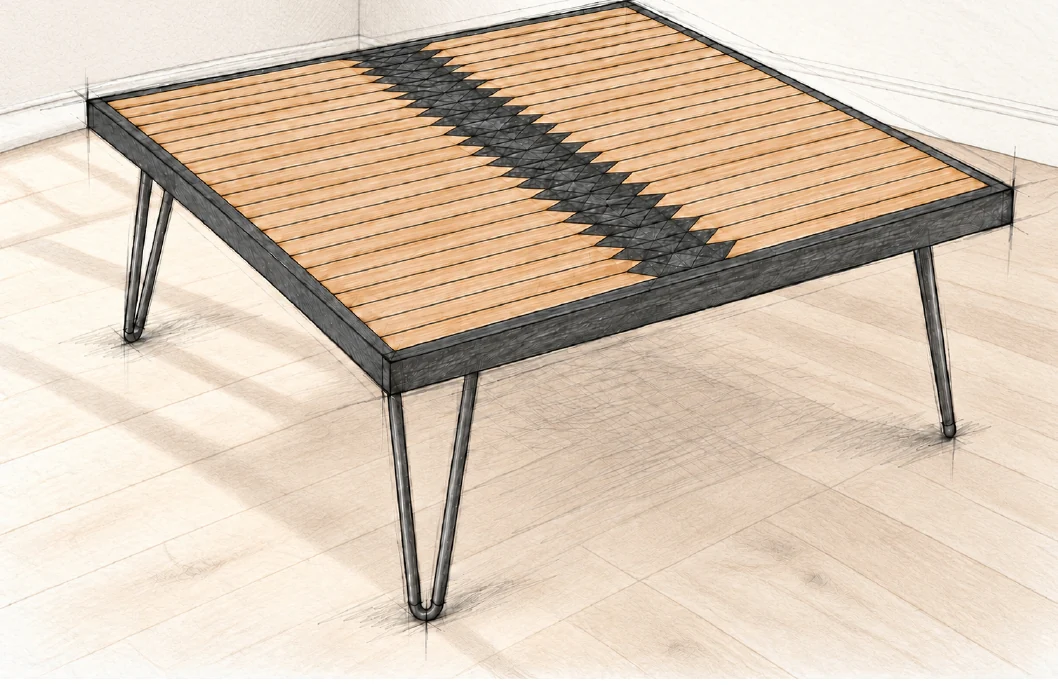
WOODWORKING PLANGeometric Hairpin Coffee Table
WOODWORKING PLANHollow Panel Waterfall Console
WOODWORKING PLANFarmhouse Console Table
WOODWORKING PLANBarn Door Console
WOODWORKING PLANBeginner Farm Table
WOODWORKING PLANFarmhouse Coffee Table
Geometric Hairpin Coffee TableFREE WOODWORKING PLAN
Tables / INTERMEDIATE

Geometric Hairpin Coffee Table

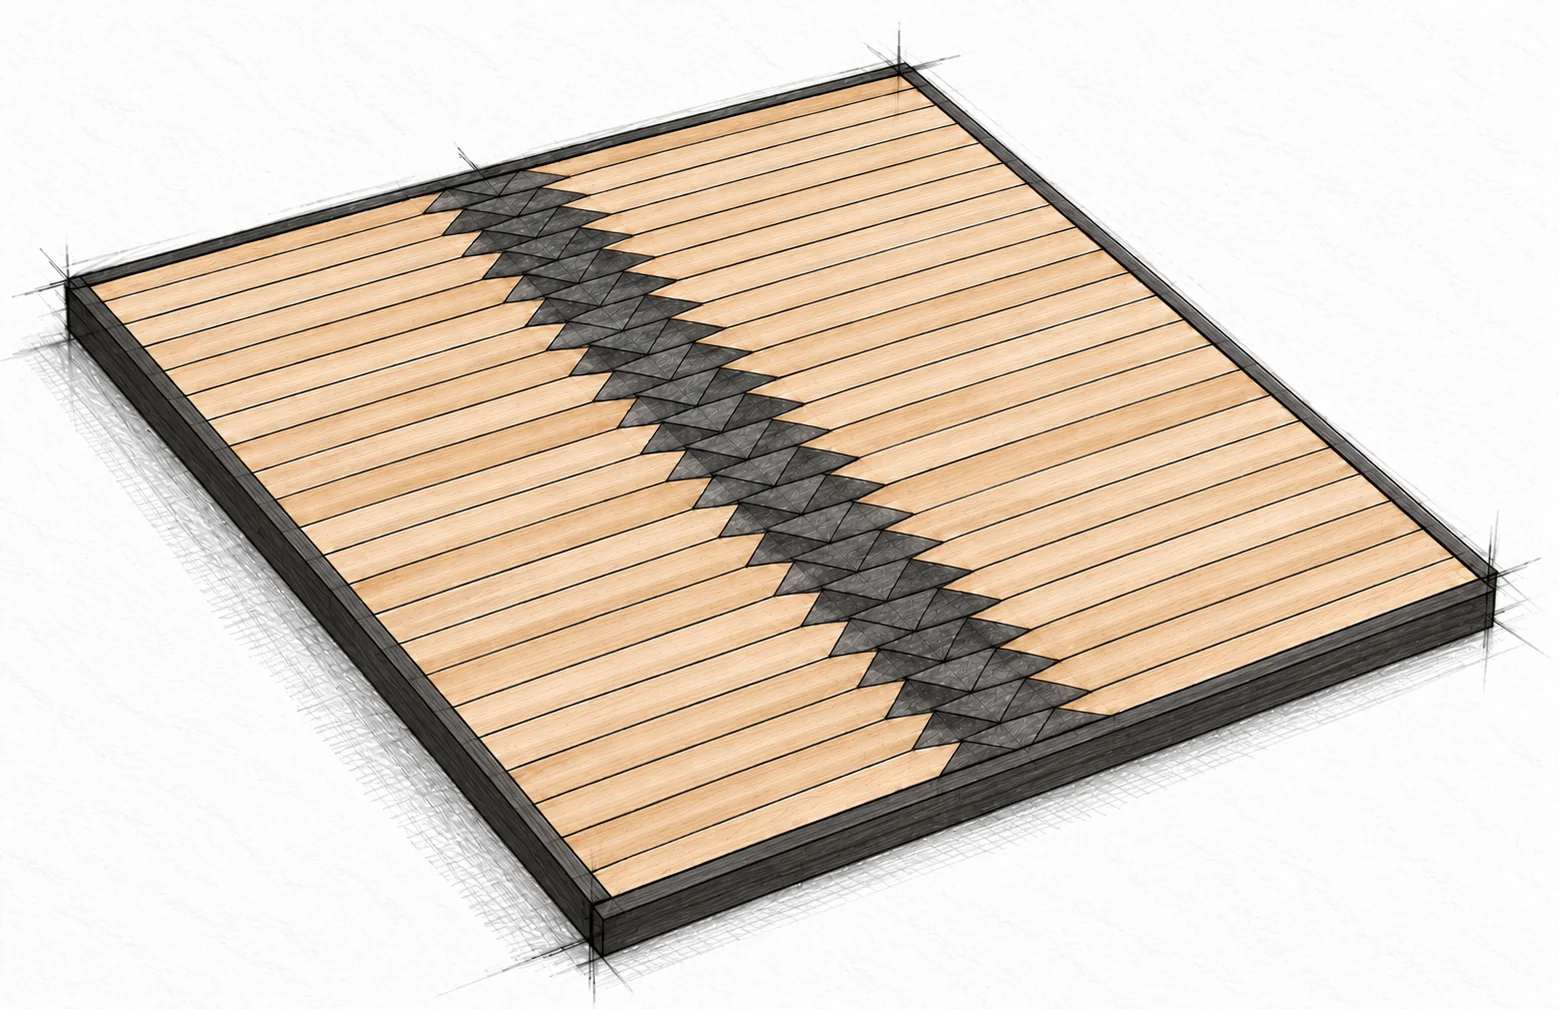
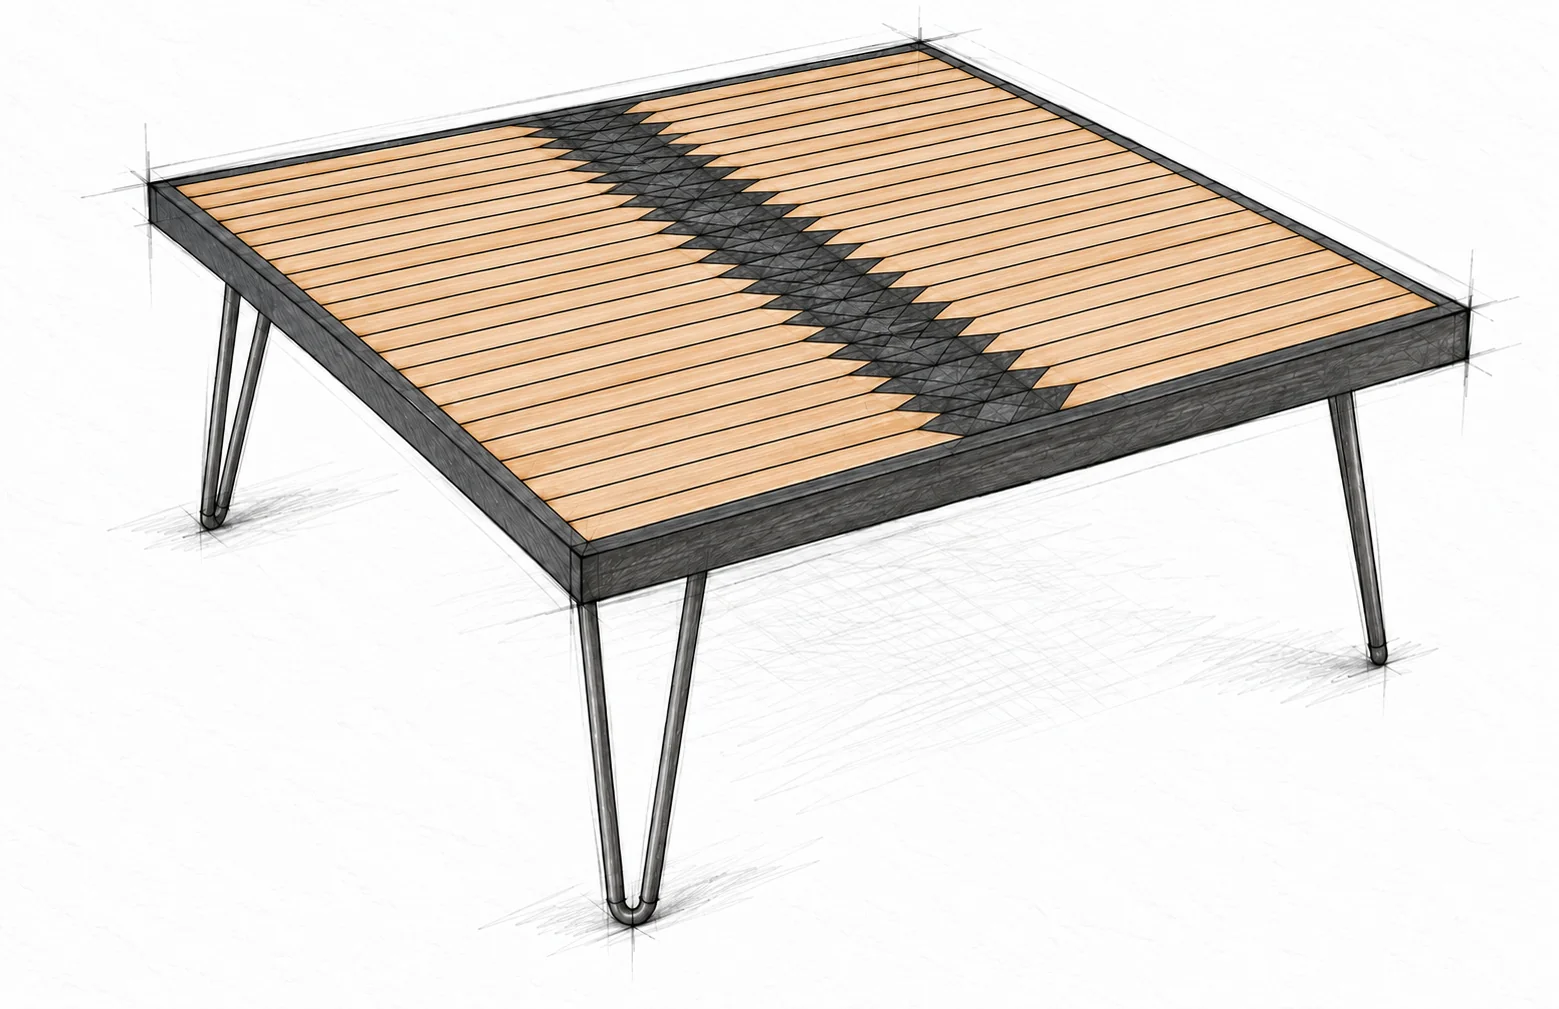
A square patterned top with dark geometric accents and slender steel hairpin legs.

FINISHED DIMENSIONS34 1/2 × 34 1/2 × 17 1/2 in
SKILL LEVELIntermediate
WHAT IS INCLUDEDMaterials, cut list and illustrated steps
Read the free planMade this plan? Share your build
A GOOD BUILD STARTS WITH A CLEAR PLAN
  • Materials and tools
  • Cutting information and dimensions
  • Illustrated assembly steps
FROM THE FIRST CUT TO THE LAST DETAIL

Take it one step at a time

Everything you need to follow this build is written below. Read the materials, measurements and construction notes before your first cut.

Read the build steps

Yes. The complete plan is available to read on this page.
THE FREE BUILD GUIDE

Geometric Hairpin Coffee Table

A square patterned top with dark geometric accents and slender steel hairpin legs.

READ BEFORE BUILDING

A patterned top on a stable core

What you will build

The top combines a 33 in square plywood core, narrow solid-pine decorative pieces and upright edge trim. Four purchased 16 in hairpin legs support it. This is an intermediate fitting project: many small 45-degree cuts must repeat accurately.

Do not substitute a solid panel

Keep the plywood substrate and narrow individual mosaic pieces. This is not a wide edge-glued solid-wood top. Do not replace the core with solid lumber or enlarge the pattern without revisiting its construction.

Start with consistent stock

Use dry, straight, untreated indoor lumber. Acclimate it in the room where the table will live. Reject cupped pieces. Check that all decorative pieces have the same thickness before cutting; a raised corner cannot be corrected by forcing it down with nails.

Use actual measurements

Nominal 1x2 stock is normally 3/4 x 1-1/2 in (19.1 x 38.1 mm). The design depends on that actual width. Plywood sold as 3/4 in may be thinner, so check the composite thickness and edging fit before assembly.

STOCK FOR ONE PROJECT

Materials and fasteners

Buy one complete matching leg set before drilling. Leg mounting-hole patterns vary; use the holes and screw compatibility specified for the selected plates.

QuantityItemSize or specification
12 boardsPine 1x28 ft each; actual 3/4 x 1-1/2 in (19.1 x 38.1 mm)
1 panelPlywood3/4 x 48 x 48 in (19.1 x 1219.2 x 1219.2 mm)
4 legsSteel hairpin legs16 in (406.4 mm) height; 1/2 in (12.7 mm) rod; corner mounting plates
As neededWood glueSuitable for clean wood and plywood; follow its spread and cure directions
As neededBrad nails1-1/4 in (31.8 mm), for perimeter edging
To suit platesWasher-head wood screws1-1/4 in (31.8 mm); confirm plate holes, screw diameter and safe penetration
As neededSurface preparation120-grit abrasive; clean cloths; tung-oil-type wood finish
WORKSHOP SETUP

Tools and preparation

Measure and cut

Tape measure, pencil, square, miter saw and a safe small-parts holding setup. Have the plywood cut square or use a guided saw with full support. Check the blade angle on scrap, then make a matched pair of strips before batching all parts.

Assemble

Drill/driver, pilot bit and depth stop, brad nailer, glue spreader and a flat protective caul. Stable weights hold the mosaic flat while the glue cures. Keep all fasteners out of future cutting paths.

Protect yourself

Wear eye and hearing protection for cutting and nailing; control dust and use suitable respiratory protection. Disconnect power before setup changes. Keep fingers outside the tool maker's exclusion zone and never hand-hold tiny offcuts beside a moving blade.

Separate flame from finishing

A gas torch is used for the contrasting scorched surfaces. Work only on untreated wood, outdoors on noncombustible ground, away from sawdust, solvent, oil and other combustibles. Wear closed shoes and suitable protective clothing. Keep an appropriate extinguisher ready; never leave hot pieces unattended.

SIZE REFERENCE

Check the finished proportions

Square top / Four matching 16 in legs

geometric hairpin coffee table — 5 illustration
Check the finished proportions · Geometric Hairpin Coffee Table

Overall size

The nominal footprint is 34-1/2 in square (876.3 mm). A 16 in (406.4 mm) leg plus the nominal 1-1/2 in (38.1 mm) layered top gives a 17-1/2 in (444.5 mm) table height.

Core and border

The 33 in (838.2 mm) square core gains 3/4 in (19.1 mm) of upright edging on every side. The border covers the plywood and mosaic layers together.

CUT AND LABEL BEFORE ASSEMBLY

Cut list

Lengths are finished sizes. Keep saw kerf on the waste side. Part C is a right-angle triangular piece with a 3 in base and a 1-1/2 in perpendicular height; it is not a 3 in rectangular block.

PartQtyStock and useCut inCut mm
A1Plywood core33 x 33838.2 x 838.2
B441x2 mosaic strips15 long point; one end 45 degrees381.0 long point
C661x2 triangles3 base; two 45-degree cuts76.2 base
D21x2 short edging33; square ends838.2
E21x2 long edging34-1/2; square ends876.3

Dry-fit the repeat

There are 22 rows across the 33 in core: two long strips and three triangles per row. Check one complete repeat before cutting the batch. Verify the actual stock width is 1-1/2 in.

STOCK LAYOUT REFERENCE

Plan the stock before cutting

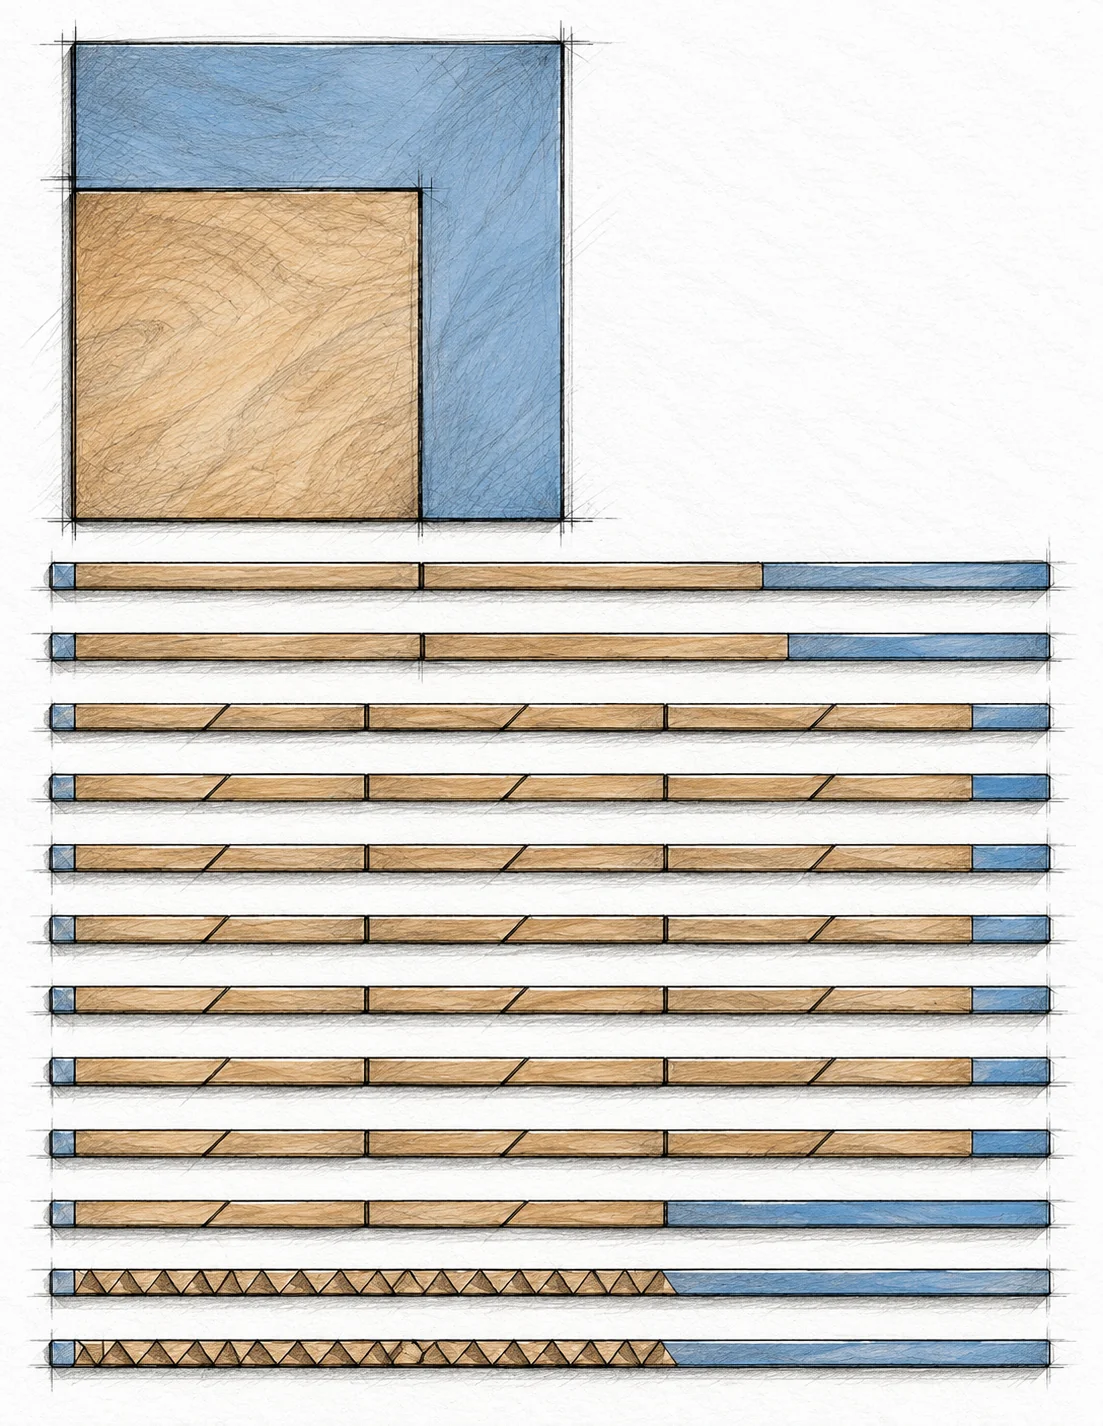
One plywood panel / Twelve 8 ft 1x2 boards

geometric hairpin coffee table — 7 illustration
Plan the stock before cutting · Geometric Hairpin Coffee Table

Reserve the trim first

Use two boards for D and E: two 33 in pieces from one, and two 34-1/2 in pieces from the other. Keep the remaining eight strip boards and two triangle boards separate.

STOCK LAYOUT REFERENCE / CONTINUED

Plan the stock before cutting

Allow for saw kerf

Six 15 in strip blanks use 90 in before kerf. Seven boards can yield 42 strips; the eighth yields the final two. Alternate the triangle cuts as shown, rather than wasting a full rectangular 3 in block for each triangle. Check the real blade kerf and defects before committing.

READ THE CUT LIST

The sketch shows cut arrangement, not a measuring template. Any extra drawn strip segments are spare stock, not additional parts. Cut only the 44 strips in the cut list.

STEP 01 / CUTTING PREPARATION

Set up the repeated angled cuts

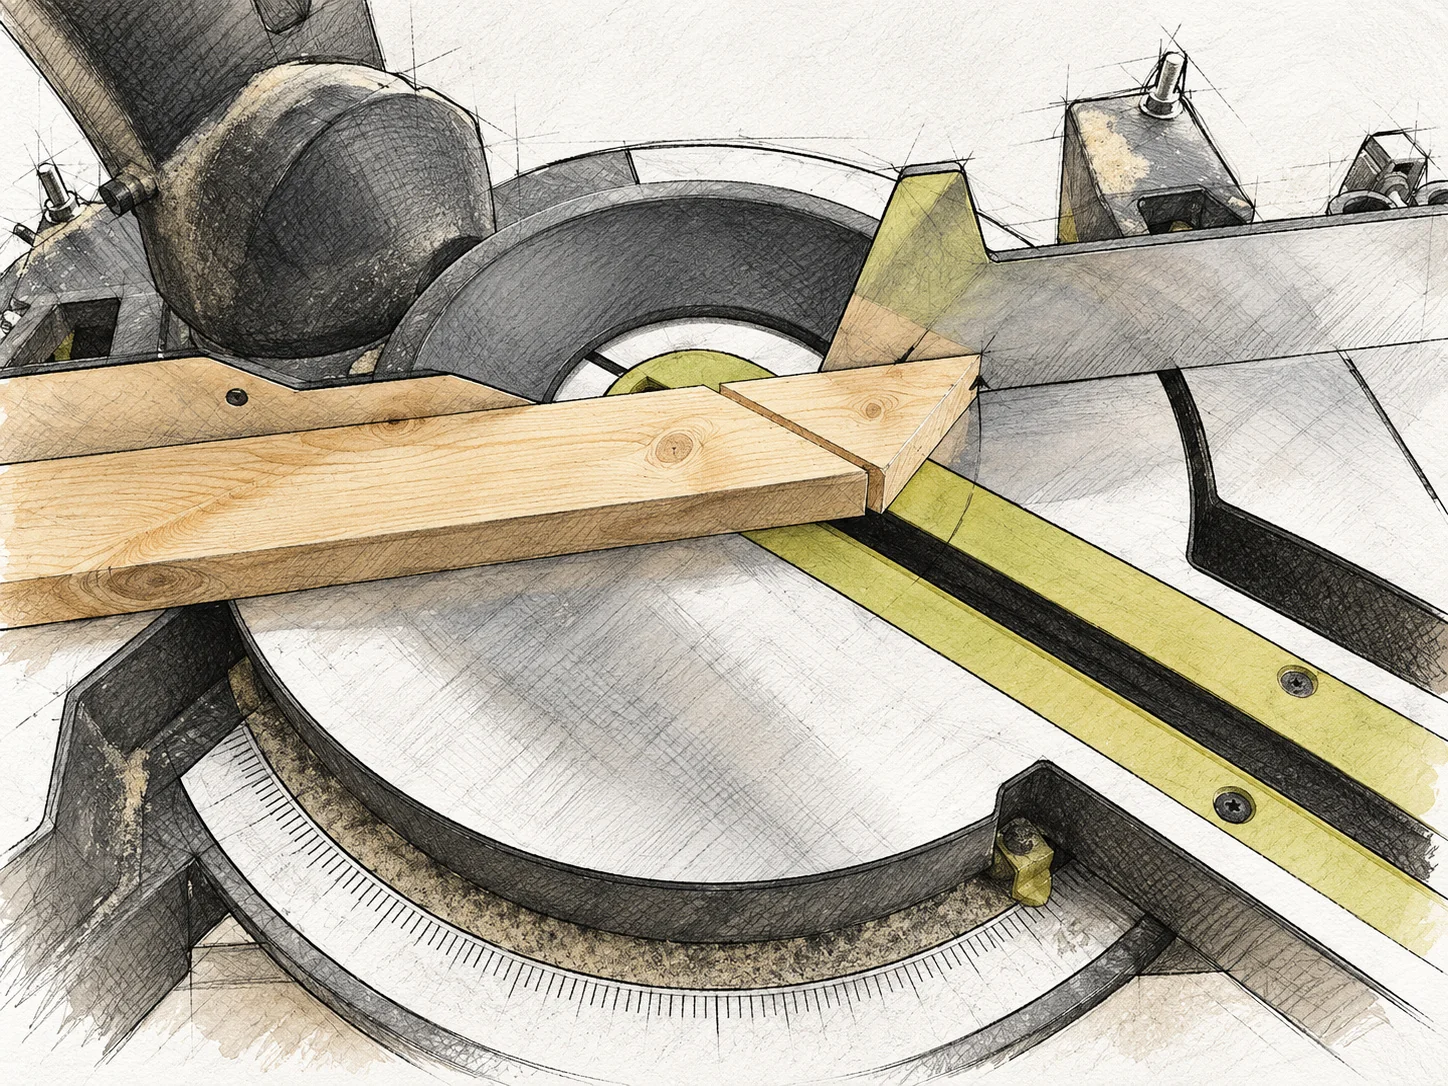
B x 44 / C x 66 / A stopped saw setup

geometric hairpin coffee table — 9 illustration
Set up the repeated angled cuts · Geometric Hairpin Coffee Table

Check the template

Use the first accurate triangle to check the repeated 45-degree layout with the saw stopped and disconnected. Mark the waste side; account for the width removed by the blade.

Cut only with safe support

A small triangle cannot be safely held beside the blade by hand. Use a secured support and retention method allowed by the saw manufacturer, or have a qualified shop make these small cuts. Remove the loose measuring template before operating the saw.

STOP BEFORE CLEARING

Wait for the blade to stop completely before lifting it or retrieving any offcut. Never cut a loose triangle.

STEP 02 / SURFACE PREPARATION

Prepare the contrasting surfaces

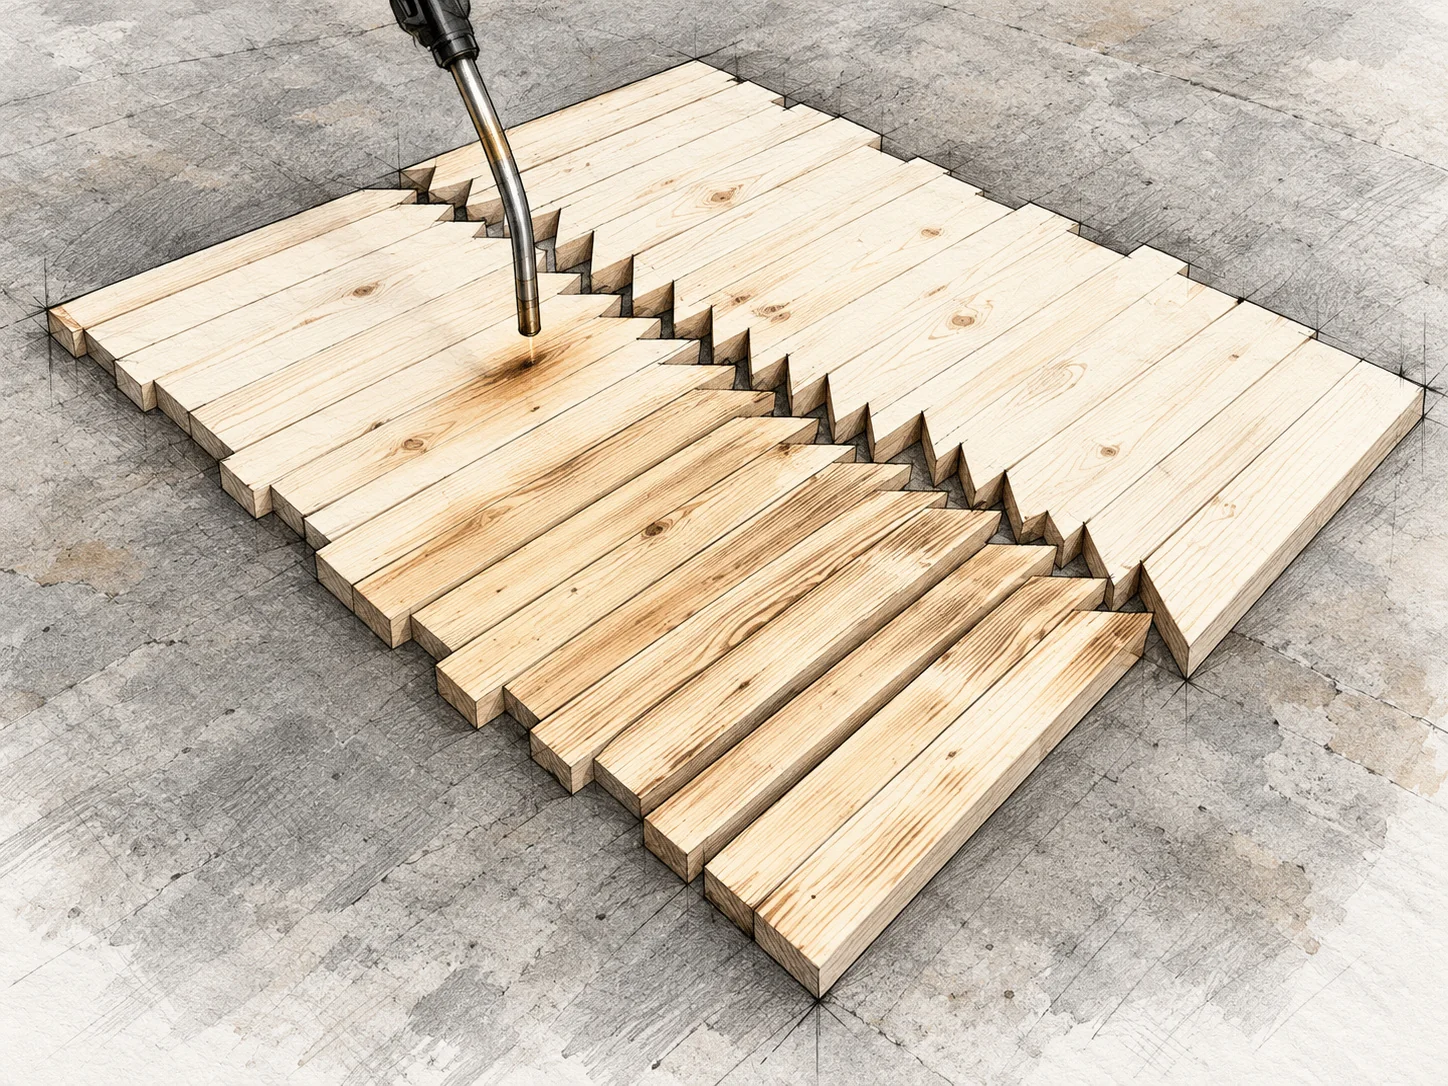
Mosaic strips and triangles / 120-grit abrasive

geometric hairpin coffee table — 10 illustration
Prepare the contrasting surfaces · Geometric Hairpin Coffee Table

Smooth before scorching

Lightly sand the rough edges with 120-grit abrasive. Arrange the parts by group so the long strips remain lighter than the dark central triangles. Test the effect on offcuts first.

Keep the bond faces sound

Work over a noncombustible surface, not over the plywood core. Keep the underside glue faces clean, flat and uncharred. Move the torch continuously and avoid burning away corners needed for the close-fitting pattern.

STEP 02 / SURFACE PREPARATION

Darken the perimeter trim

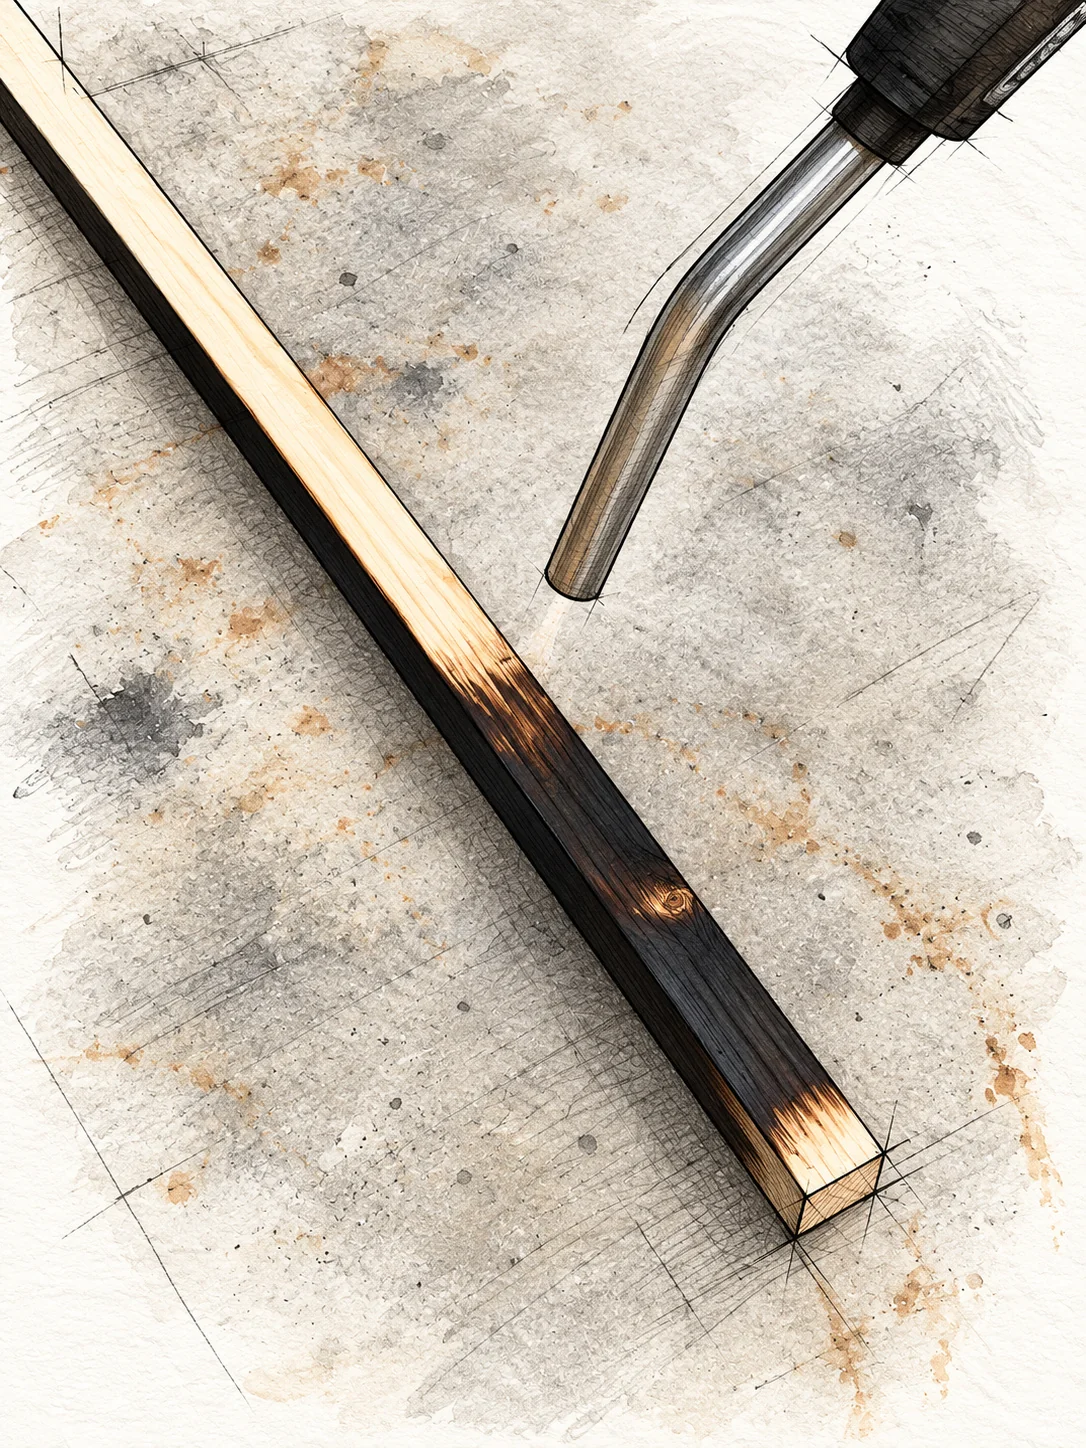
D x 2 / E x 2 / Torch finish reference

geometric hairpin coffee table — 11 illustration
Darken the perimeter trim · Geometric Hairpin Coffee Table

Work in a clear area

Scorch the visible trim faces to suit the darker center pattern. Keep the torch nozzle clear of the wood and the gas supply away from the hot work. Follow the torch manufacturer's lighting and shutdown instructions.

Cool and inspect

Shut off the torch and allow every piece to cool fully. Check for lingering heat or embers before moving anything indoors. Do not apply oil or any solvent-based coating to warm wood.

STEP 03 / PATTERN REFERENCE

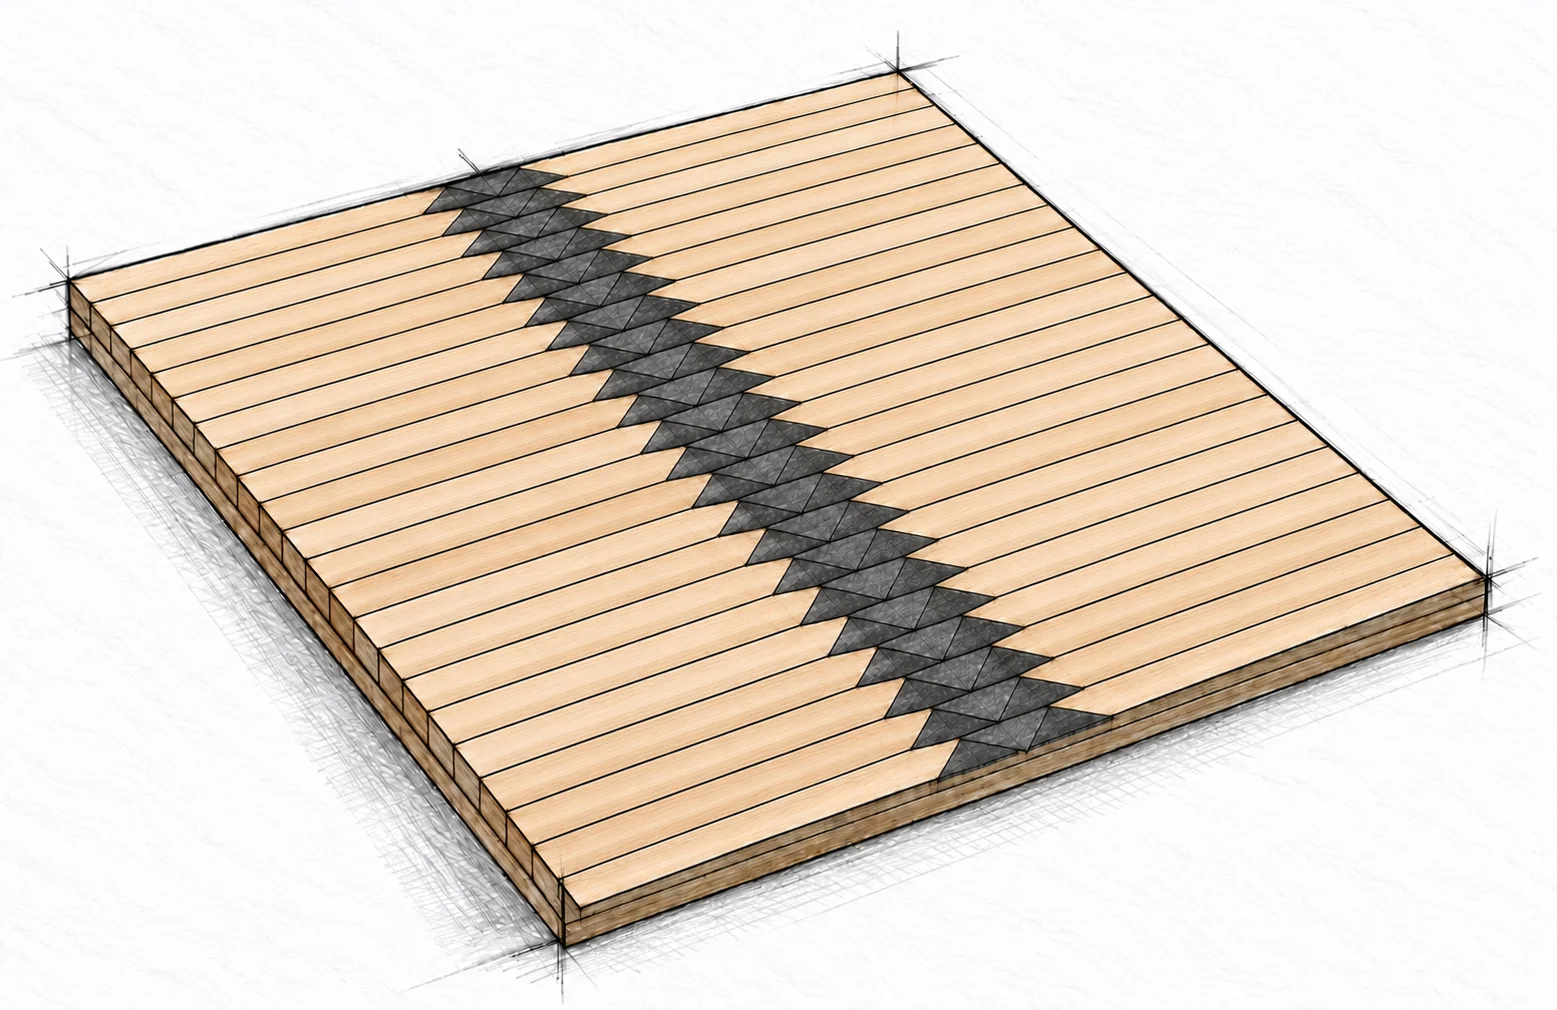
Lay out the whole mosaic

A x 1 / B x 44 / C x 66

geometric hairpin coffee table — 12 illustration
Lay out the whole mosaic · Geometric Hairpin Coffee Table

Build a complete dry layout

Lay the 44 long strips and 66 small triangles on the 33 in square core before using glue. The parallel pale strips point inward toward the repeated dark center pattern. Align the outside ends with the plywood perimeter.

Check all 22 repeats

Each row uses two strips and three triangles. Check the pattern, overall square, closed joints and even surface height. Correct any misfit now; do not fill a missing triangle with a different-shaped scrap.

STEP 04 / MOSAIC ASSEMBLY

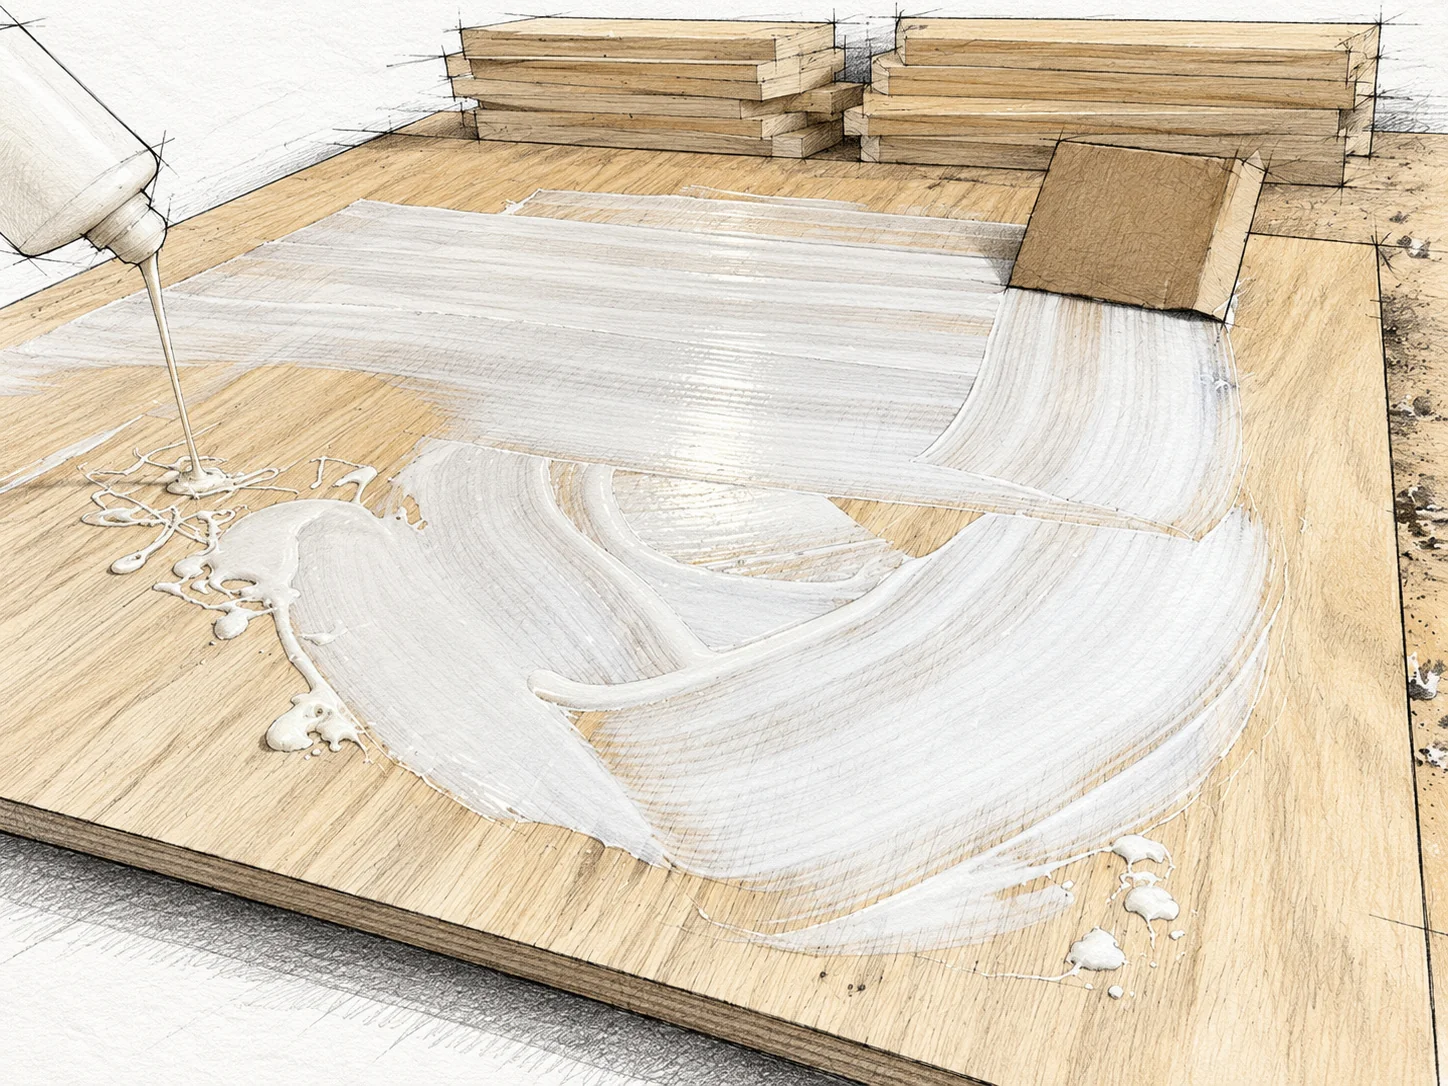
Spread glue over the core

A / Prepared mosaic pieces / Wood glue

geometric hairpin coffee table — 13 illustration
Spread glue over the core · Geometric Hairpin Coffee Table

Apply an even film

Keep the dry-fitted pieces in order while clearing the plywood. Spread wood glue evenly over the clean face with a scrap spreader. Avoid thick pools that can lift pieces or leave a soft glue line.

Respect the working time

Organize all pieces before spreading glue. Work within the adhesive's open time and keep the glue off the finished visible faces. Follow the product directions for temperature, clamping and cleanup.

STEP 04 / MOSAIC ASSEMBLY

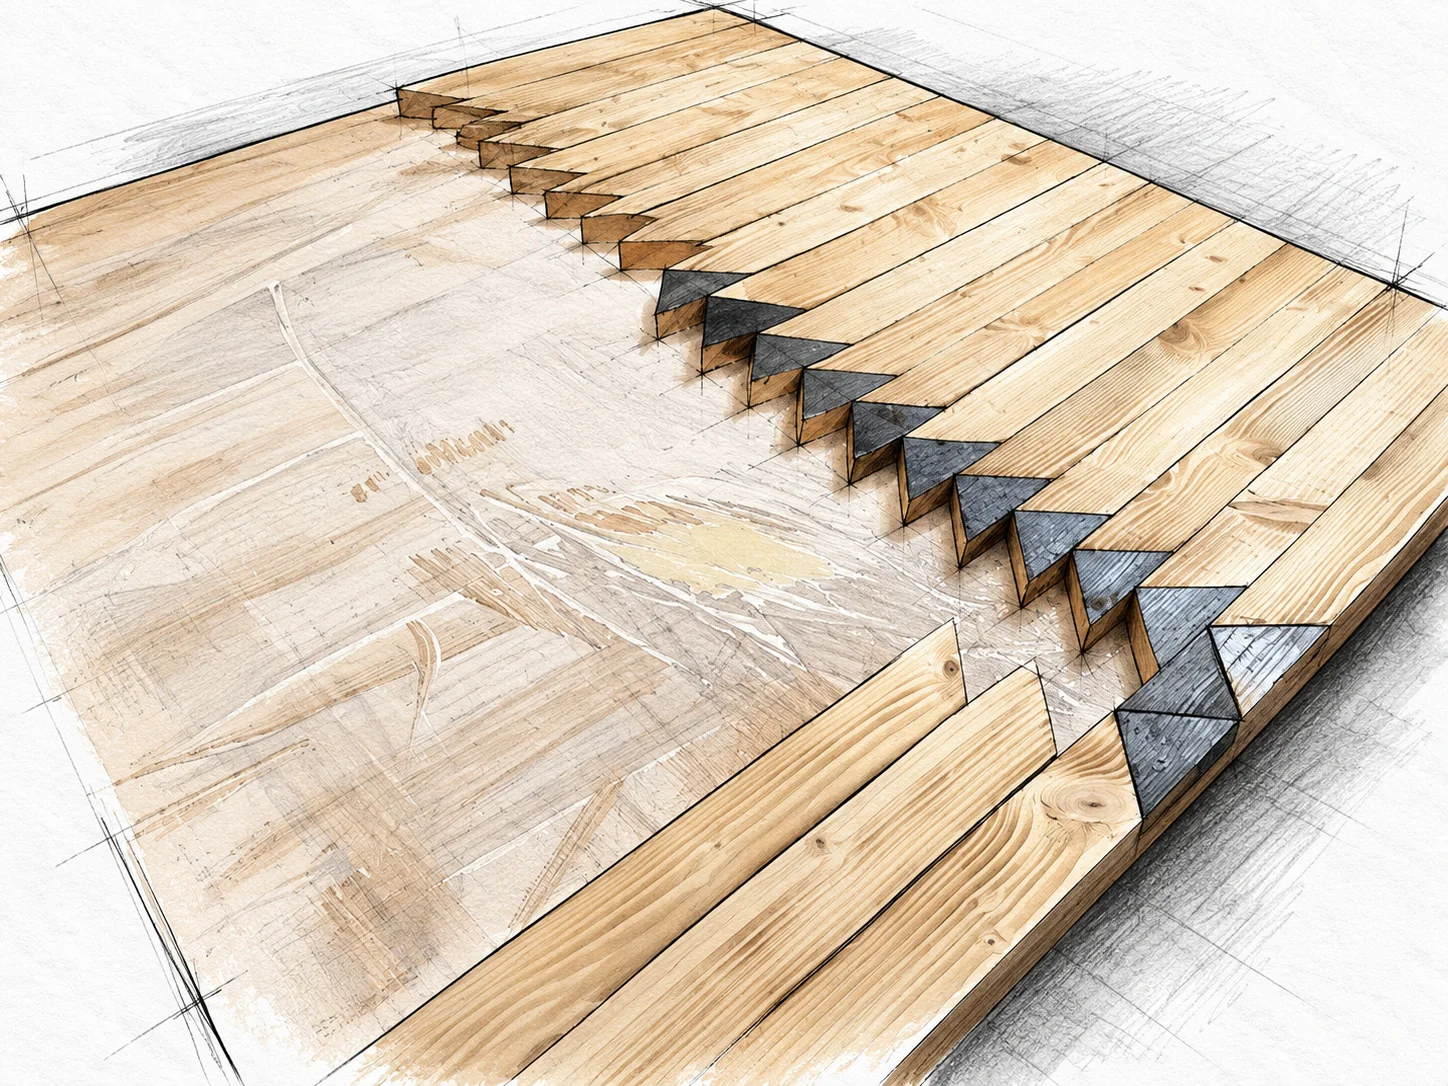
Fit the strips and triangles

Dry-layout order retained / No gaps at the pattern

geometric hairpin coffee table — 14 illustration
Fit the strips and triangles · Geometric Hairpin Coffee Table

Keep the pattern aligned

Place the strips and triangular inserts in the checked order. Seat every piece fully in the glue; keep the row edges parallel and the center detail consistent from one end to the other.

Check the surface

Look across the top and feel for lifted corners before curing. Adjust a misaligned piece while the glue is workable. Remove squeeze-out without flooding the scorched wood with water.

STEP 04 / MOSAIC ASSEMBLY

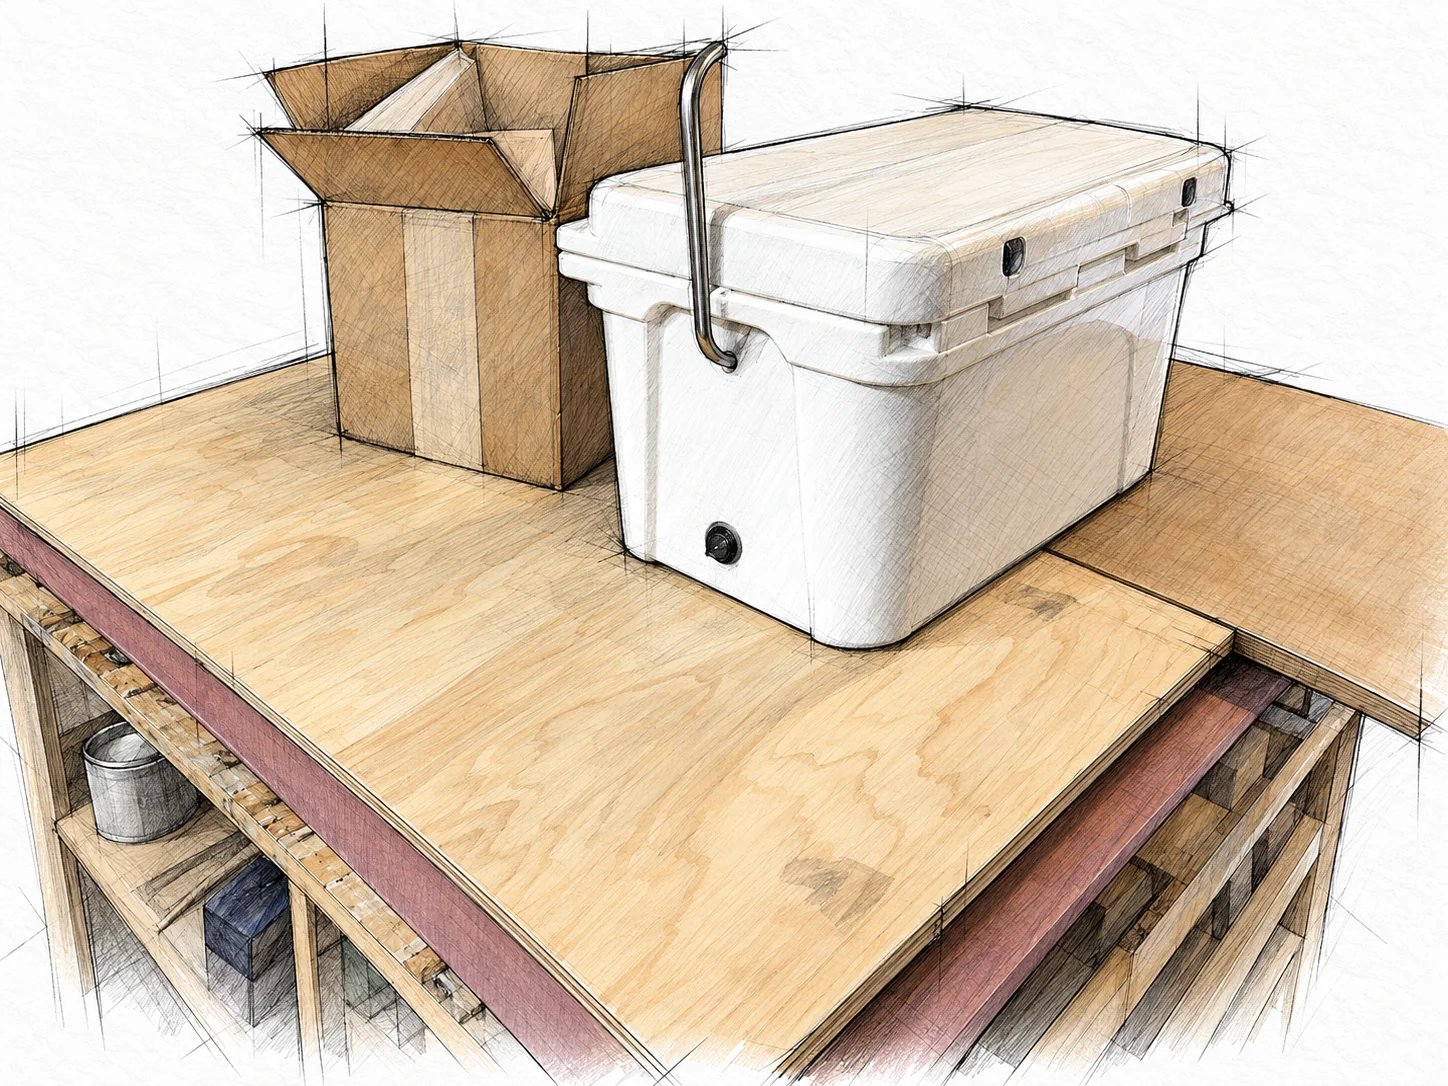
Hold the mosaic flat while curing

Flat protective caul / Stable distributed weights

geometric hairpin coffee table — 15 illustration
Hold the mosaic flat while curing · Geometric Hairpin Coffee Table

Spread pressure evenly

Place a clean flat caul over the complete mosaic and load it with stable weights, as shown. Protect against the caul bonding to squeeze-out. The weights must press the panel flat, not bow the workbench or tip off its edge.

Leave it undisturbed

Keep the assembly supported on a flat surface for the adhesive's specified clamp and cure periods. Remove the caul only when the joints can be handled safely, then check for loose pieces.

STEP 05 / EDGING ASSEMBLY

Fit the four edging strips

D x 2 / E x 2 / 1-1/4 in brads

geometric hairpin coffee table — 16 illustration
Fit the four edging strips · Geometric Hairpin Coffee Table

Check the butt joints

Dry-fit the two 33 in strips and the two 34-1/2 in strips around the cured top. The longer pair covers the ends of the shorter pair. The upper edge of the trim must be flush with the mosaic surface.

Check the real thickness

The 1-1/2 in tall edging is intended to cover the two nominal 3/4 in layers. Measure your actual panel; do not create a raised lip or force an oversized gap closed.

STEP 05 / EDGING ASSEMBLY

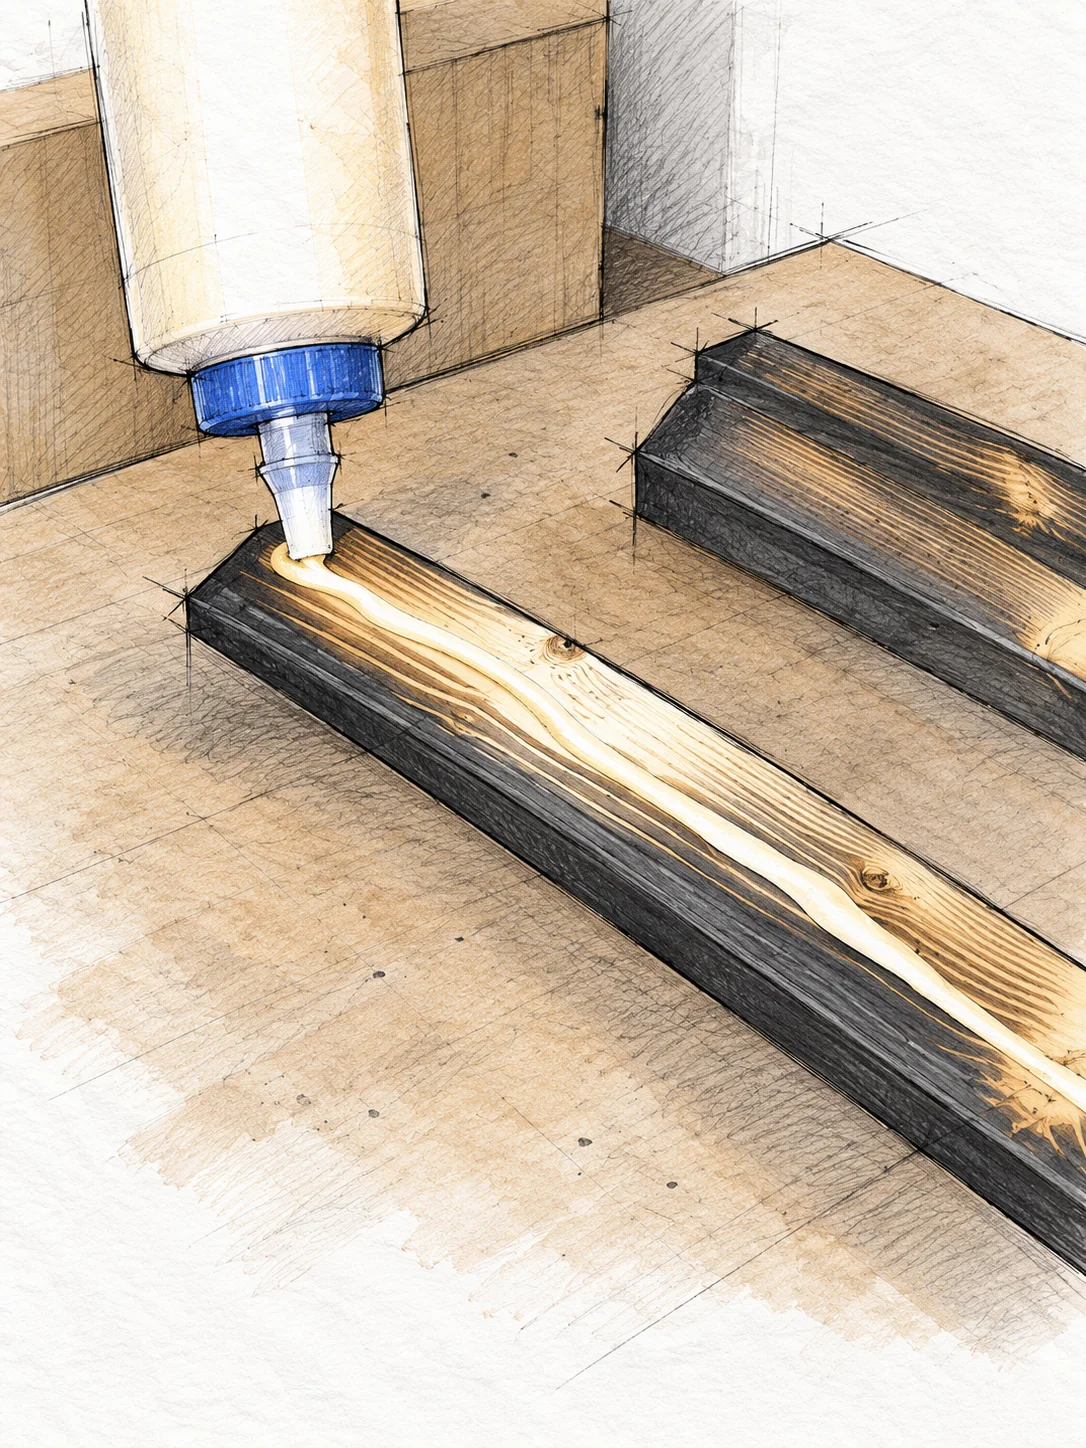
Glue the inner trim faces

D and E / Clean wood bonding faces

geometric hairpin coffee table — 17 illustration
Glue the inner trim faces · Geometric Hairpin Coffee Table

Apply the glue to the joint

Place a narrow, even bead on the trim's clean inner face and spread it over the mating surface. Seat the strip against the panel edge and align the butt joint before nailing.

Keep the top flush

Check alignment along the whole edge, not only at the corner. Do not use nails to pull a bowed or badly fitting strip into place. Keep the dark visible finish free of glue smears.

STEP 05 / EDGING ASSEMBLY

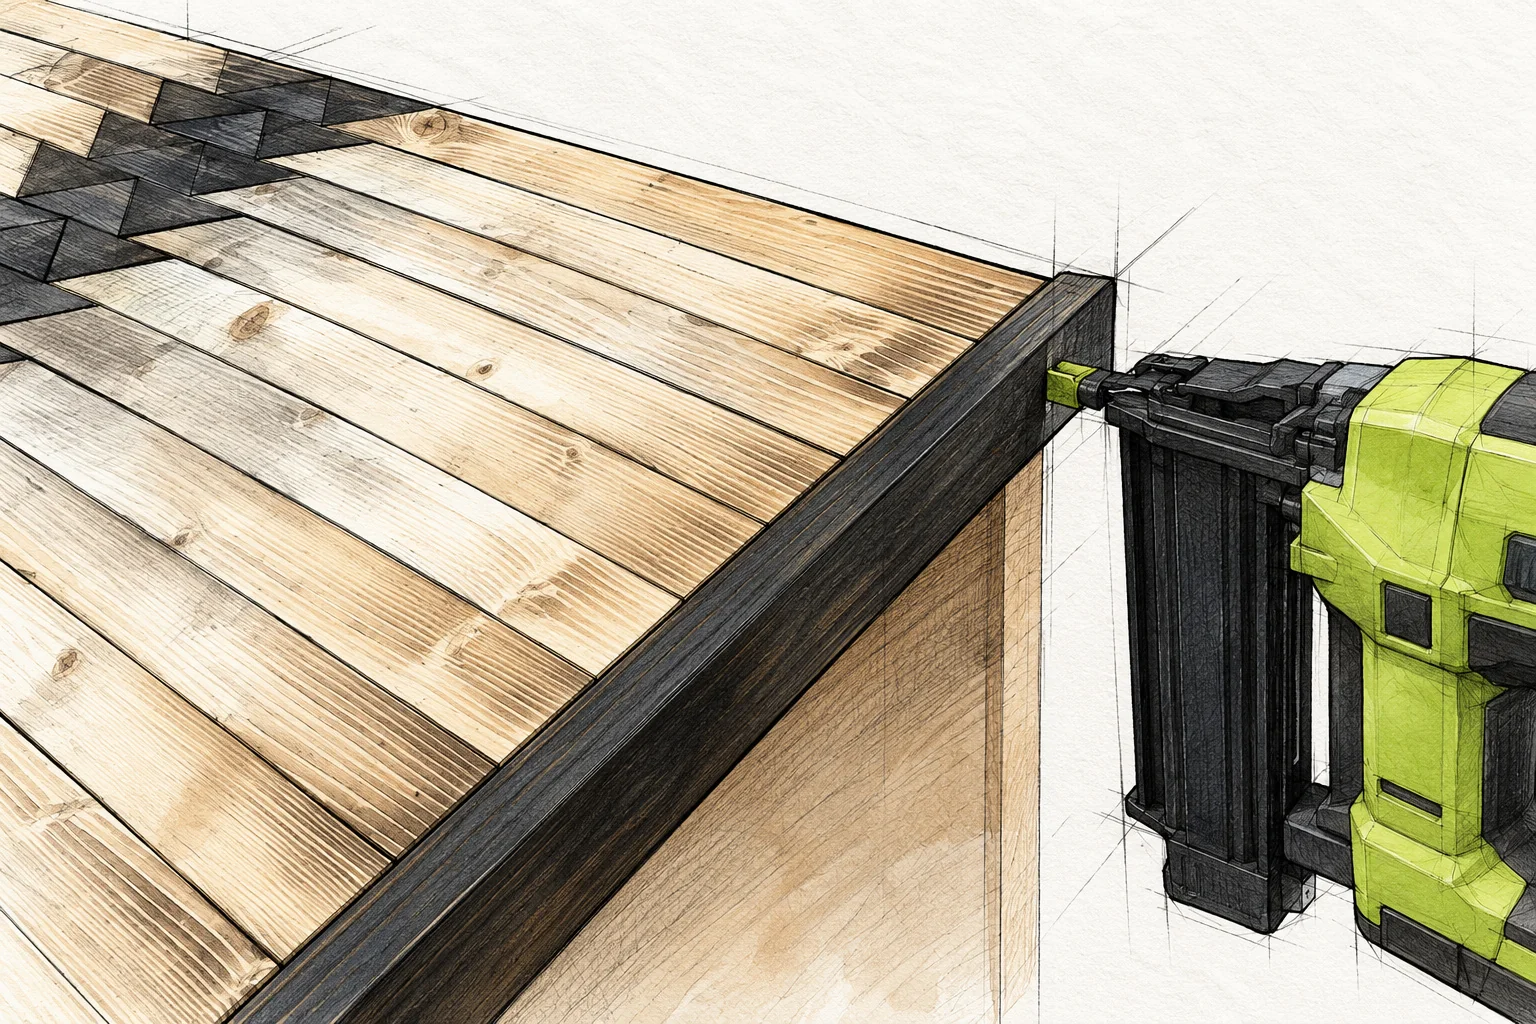
Nail the edging to the panel

1-1/4 in (31.8 mm) brads / Edging held flush

geometric hairpin coffee table — 18 illustration
Nail the edging to the panel · Geometric Hairpin Coffee Table

Aim at the wood connection

Press the nailer's contact nose squarely against the outside vertical trim face. Drive through the trim into the panel edge, not upward through the tabletop. Check the trajectory and use a scrap test to set depth.

Keep clear of the exit path

Support and hold the trim without putting fingers behind the brad path. Brads can deflect. Use the nailer's safe operating mode, keep it aimed away from people, and disconnect power before clearing a jam.

STEP 06 / LEG ASSEMBLY

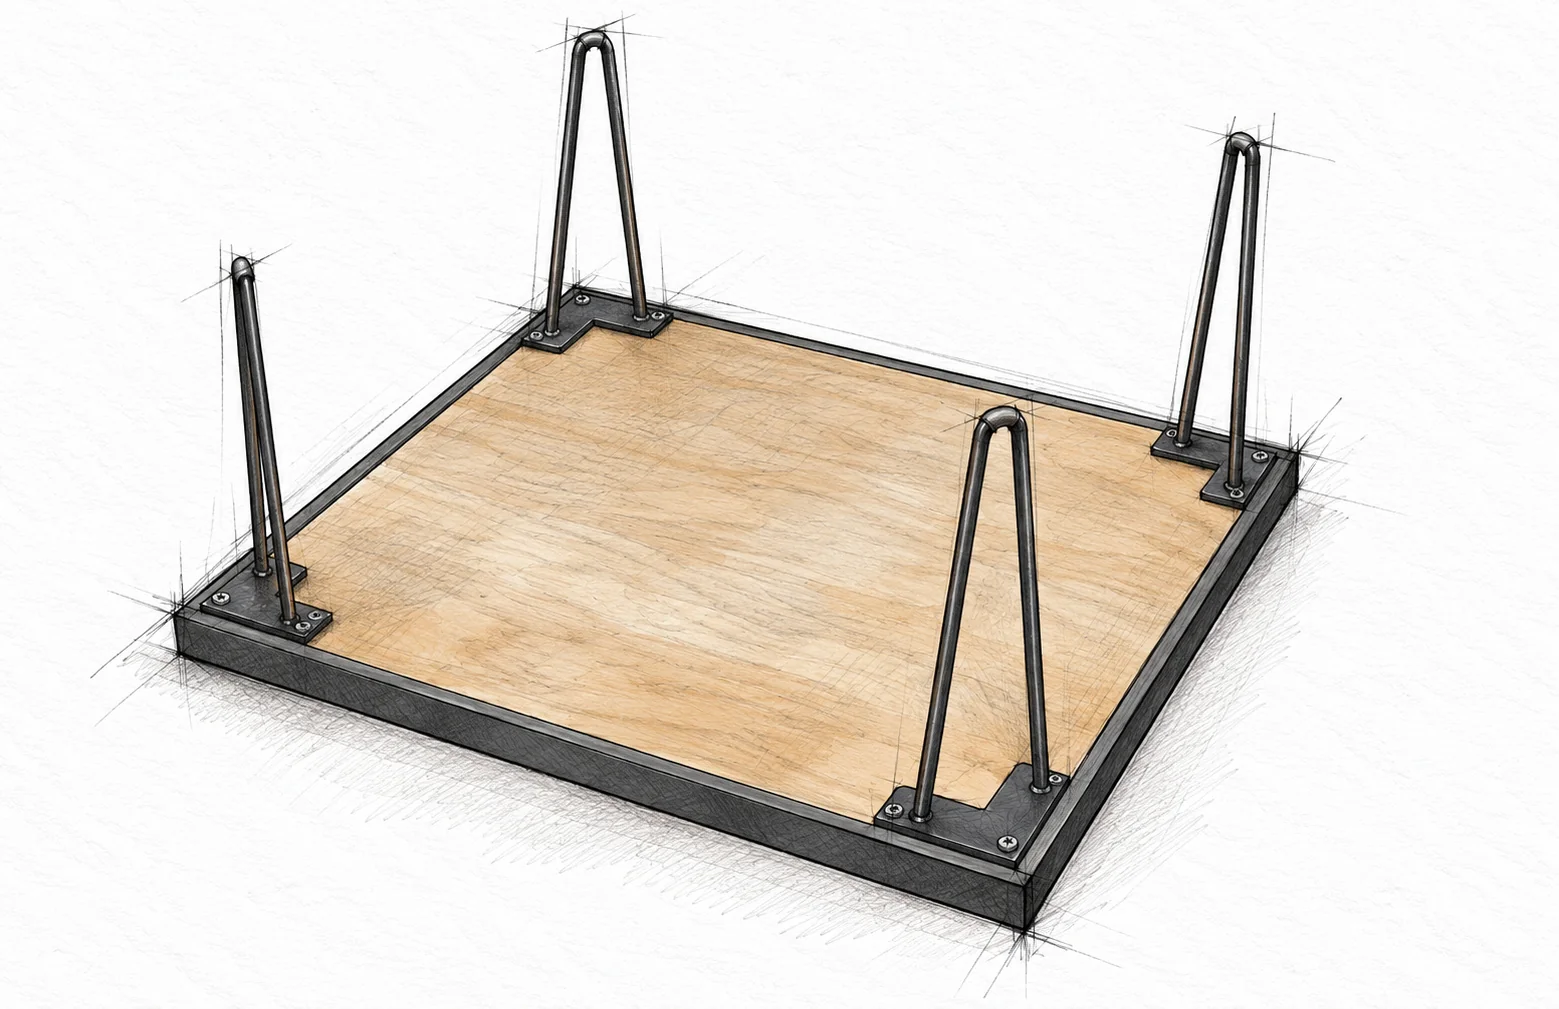
Attach the four hairpin legs

Four 16 in legs / 1-1/4 in washer-head screws

geometric hairpin coffee table — 19 illustration
Attach the four hairpin legs · Geometric Hairpin Coffee Table

Position the plates

Turn the cured top upside down on a clean padded surface. Place each corner plate flush with the plywood edges, inside the trim. Align all four legs consistently and mark the required mounting holes.

Pilot and fasten

Choose the pilot diameter for the actual screw and plywood, and use a depth stop. Fasten with 1-1/4 in (31.8 mm) washer-head wood screws compatible with the plates. Seat the heads snugly; do not strip the plywood.

PREVENT BREAKTHROUGH

Measure screw penetration after allowing for plate thickness. The tip must remain inside the nominal 1-1/2 in layered top, never emerge through the mosaic face.

FINISH AND INSPECT

Step 07: Finish and inspect

Apply the final protective finish

With every part cool and all glue fully cured, apply a compatible tung-oil-type wood finish according to its label. Test first: dark charcoal can tint the lighter strips. Remove loose residue that would shed during use and wipe away excess finish rather than leaving a sticky film.

Handle oily materials safely

Keep oils and solvents away from flame. Dispose of or store used oily rags exactly as directed by the finish manufacturer because they can self-heat. Observe ventilation, drying and full curing requirements.

Inspect before use

Check each decorative piece for adhesion, the perimeter for sharp edges or protruding nails, and all leg screws for secure seating. Place the table on a level floor and check for wobble. Stop using it if a leg or top connection loosens.

Care and limitations

Use indoors, away from standing water, direct heat and abrupt humidity changes. Use coasters and lift rather than drag the table. This plan has no verified load rating; the table is not a seat, step or climbing surface.

MAKE IT YOURS

Measure your own stock and dry-fit before fastening. If you make this project, I would love to see what you built.

Share your build