WOODWORKING · DIY · A HANDMADE HOME @grainbyjoy
GRAIN by JoyWOODWORKING PLANS · WORKSHOP STORIES · HOME
FIND YOUR NEXT GOOD THING
WOODWORKING PLANPullout Bin Kitchen Island
WOODWORKING PLANFarmhouse Media Console
WOODWORKING PLANRound Coffee Table
WOODWORKING PLANGeometric Hairpin Coffee Table
WOODWORKING PLANHollow Panel Waterfall Console
WOODWORKING PLANFarmhouse Console Table
WOODWORKING PLANBarn Door Console
WOODWORKING PLANBeginner Farm Table
WOODWORKING PLANFarmhouse Coffee Table
FREE WOODWORKING PLAN
Tables / INTERMEDIATE

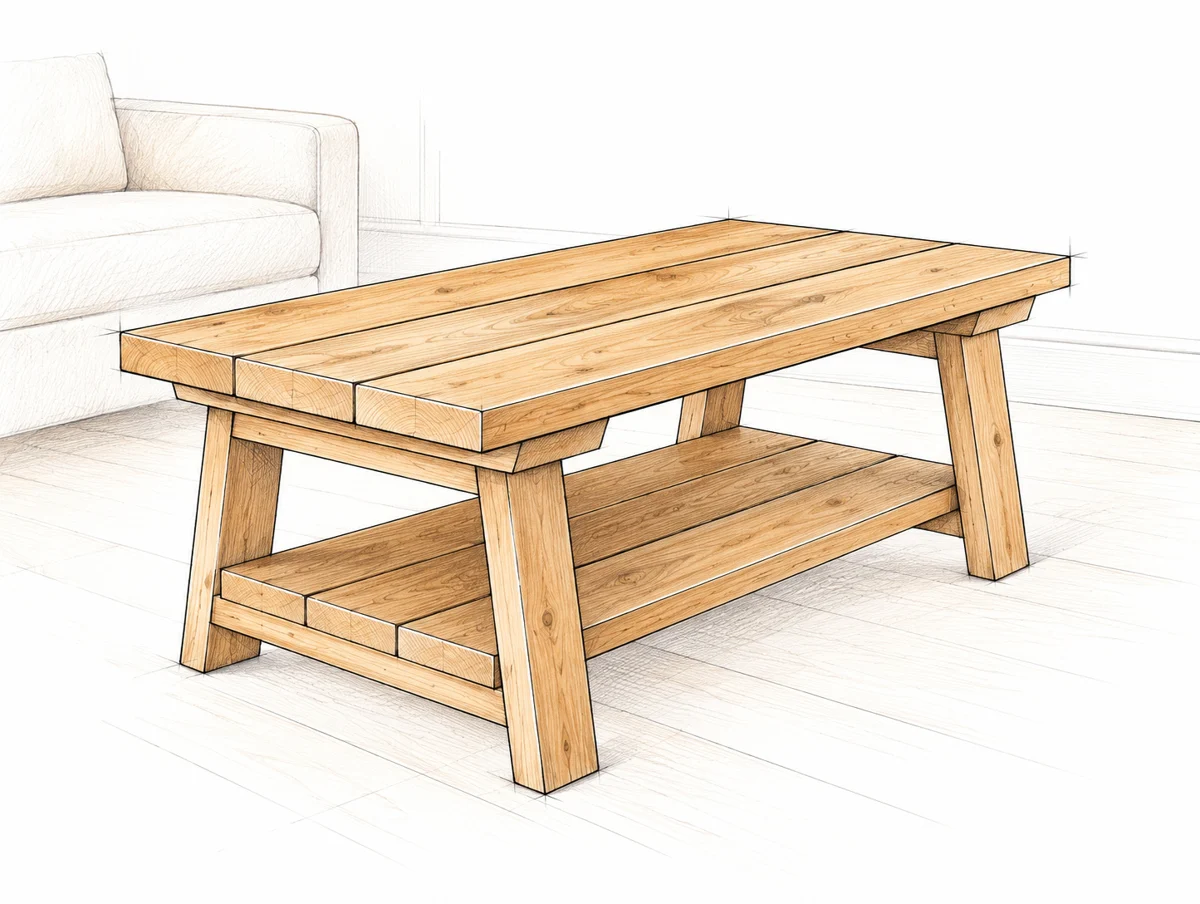
Homestead Coffee Table

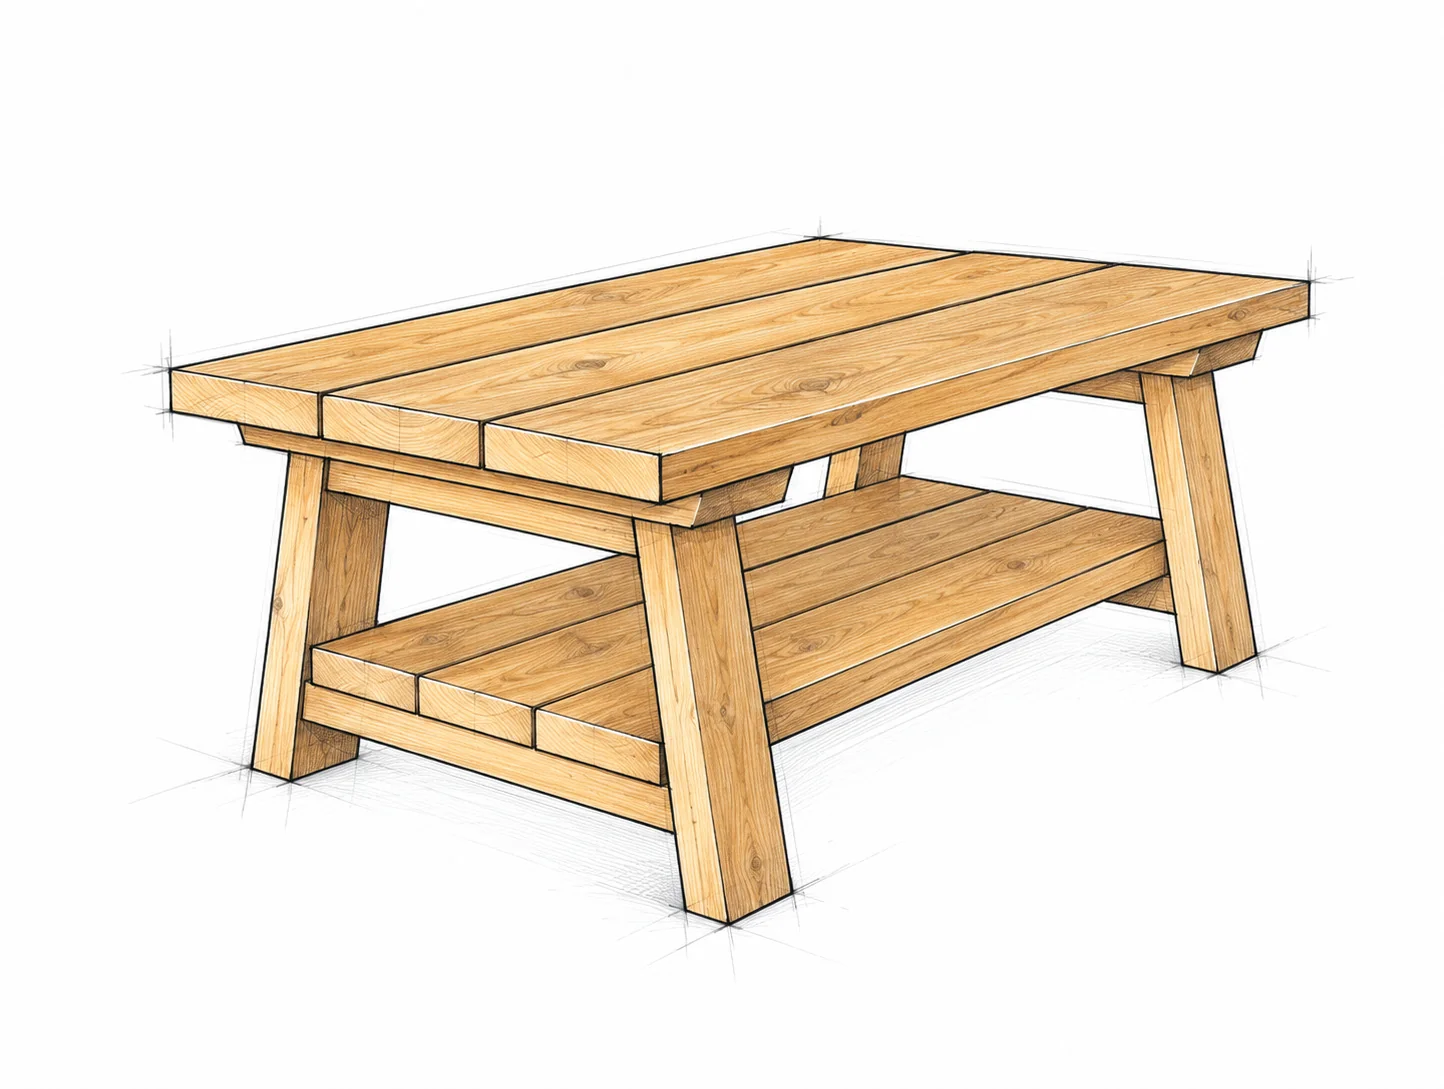
A low farmhouse table with splayed end frames and a three-board shelf.

FINISHED DIMENSIONS48 × 21 3/4 × approx. 16 in
SKILL LEVELIntermediate
WHAT IS INCLUDEDMaterials, cut list and illustrated steps
Read the free planMade this plan? Share your build
A GOOD BUILD STARTS WITH A CLEAR PLAN
  • Materials and tools
  • Cutting information and dimensions
  • Illustrated assembly steps
FROM THE FIRST CUT TO THE LAST DETAIL

Take it one step at a time

Everything you need to follow this build is written below. Read the materials, measurements and construction notes before your first cut.

Read the build steps

Yes. The complete plan is available to read on this page.
THE FREE BUILD GUIDE

Homestead Coffee Table

A low farmhouse table with splayed end frames and a three-board shelf.

UNDERSTAND THE BUILD

A table in four stages

48 × 21 3/4 × approx. 16 in

A table in four stages · Homestead Coffee Table

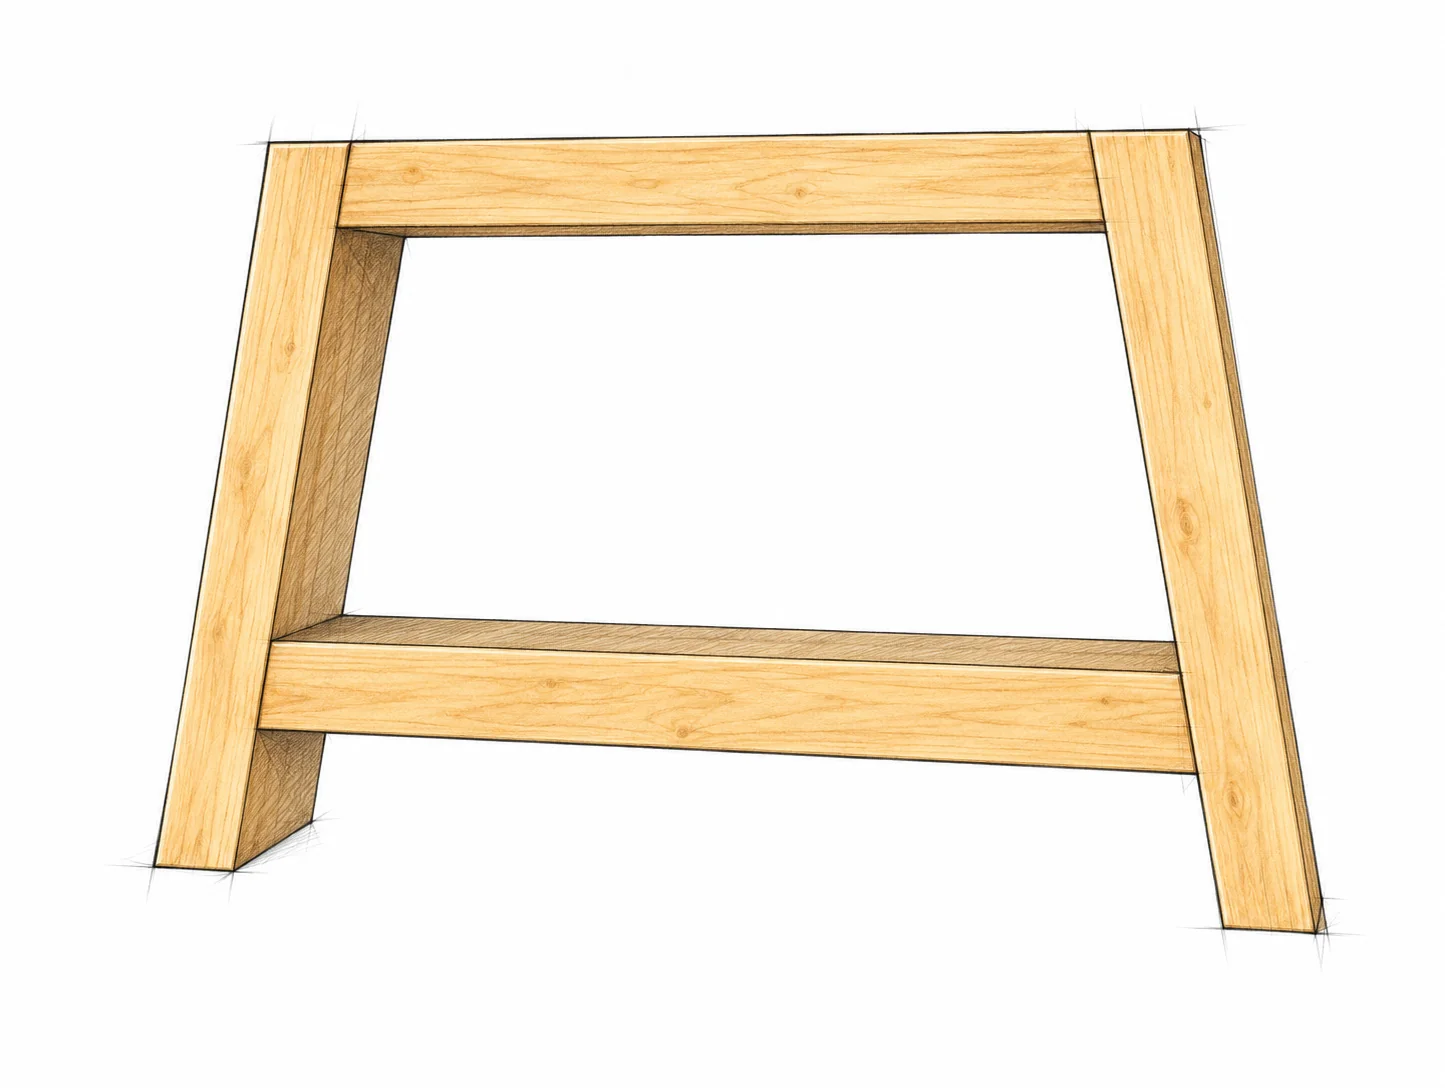
Two matching end frames

Build two splayed end frames, add their mounting plates, attach the top, then fit the shelf. Each frame has a short upper rail and a longer lower rail.

Separate top and shelf planks

Three 2×8 boards form the top; three 2×6 boards form the shelf. Keep their long edges unglued. The sketches explain assembly, not machining tolerances: use the written dimensions and never scale a cut from an illustration.

BEFORE THE FIRST CUT

Materials

Choose straight, dry indoor-grade boards with sound edges. Reject splits and loose knots near joints or angled ends.

QuantityNominal stockPurchase length
1 board2×412 ft / 144 in 3657.6 mm
2 boards2×68 ft / 96 in each 2438.4 mm each
3 boards2×86 ft / 72 in each or longer 1828.8 mm each or longer

Fasteners

Use 2 1/2 in (63.5 mm) pocket-hole screws for the frames and 2 1/2 in self-tapping star-drive wood screws for the plates, top and shelf. Total quantities and gauge are not specified; choose screws compatible with the wood and jig.

Glue and finishing supplies

Add wood glue, abrasives and a compatible interior finish. Use a protective clear coat over stain. Keep filler, a dust brush and lint-free cloths to hand.

Allow for saw cuts

Three 48 in top pieces total 12 ft before saw kerfs. A single exact 12 ft board cannot yield them. Give each plank its own longer blank for squaring and cutting.

SET UP THE WORKSHOP

Tools and safe preparation

Read every stage first. This guide uses 10° angled ends and concealed frame joinery, so make test cuts and a practice joint before cutting the final parts.

Measuring and assembly tools

Tape measure, square, pencil, compound miter saw, pocket-hole jig with its matched bit and stop collar, drill, driver with the correct bits, and a sander. Use a straightedge, clamps and a stable, flat workbench.

Personal protection

Wear safety glasses and hearing protection. Use dust extraction and respiratory protection appropriate to the wood and finish. Tie back hair and keep loose clothing away from moving tools.

Cut angled stock safely

Support the full board length and clamp it firmly. Keep hands outside the saw maker's danger zone. Let the blade stop before lifting it. Isolate power before adjusting the blade, bevel, stops or guards. Do not freehand an unsupported angled cut.

Drill with the work clamped

Use the jig settings for the measured stock thickness. Test the pilot depth and screw length on offcuts. Use a low driver setting and stop when the joint is snug; do not strip the hole or bury a head deeply.

Prepare for assembly

Let the lumber acclimate to its indoor setting. Mark each part, its best face and its top edge. Sand areas that become hard to reach. Ask for help turning the assembled table; do not twist the legs while lifting.

PARTS A TO F

Cut list

Lengths are finished dimensions. All angled cuts are 10° off square. Read the angle conventions on page 7 before cutting A to D.

PartQtyStockLength inmmUse
A42×413 1/4336.6Splayed legs
B22×414 5/8371.5Upper rails
C22×417 7/8454.0Lower rails
D22×620 3/4527.1Mounting plates
E32×8481219.2Top planks
F32×638965.2Shelf planks

Check the end profiles before cutting

A has parallel end slopes and is measured long point to short point. B, C and D have opposing slopes and are measured long point to long point. E and F have square ends. See page 7 for the cutting orientation.

VERIFY THE LUMBER

Sizes and stock layout

Nominal labels are shopping names. Measure the actual thickness and width before setting the jig or laying out the assembly.

NominalTypical actual size inTypical actual size mm
2×41 1/2 × 3 1/238.1 × 88.9
2×61 1/2 × 5 1/238.1 × 139.7
2×81 1/2 × 7 1/438.1 × 184.2

Lay out the 2×4

One 12 ft board supplies four A legs, two B rails and two C rails. Listed lengths total 118 in (2997.2 mm), leaving 26 in (660.4 mm) before angle waste, kerfs and trimming. Draw every cut first.

Divide the two 2×6 boards

Cut two 38 in shelf planks from one 8 ft board. From the other, cut the last shelf plank and both mounting plates. This totals 79 1/2 in (2019.3 mm), leaving space for kerfs and trimming.

Check the assembled size

Three full-width 2×8s make 21 3/4 in (552.5 mm). Three full-width 2×6s make a 16 1/2 in (419.1 mm) shelf. Overall height is approximately 16 in (406.4 mm); splayed legs and actual stock can change it slightly.

1 in = 25.4 mm. Values round half up to 0.1 mm. Lay out in one unit system.

PREPARE A TO D

Understand the angled ends

The end frames splay across the table width, not along its length. Keep the orientation of every board consistent with the sketches.

Keep the wide faces correctly oriented

The 3 1/2 in (88.9 mm) dimension of the legs and rails runs along the table length. The rails lie flat, with their broad faces horizontal. In the end view, their vertical thickness is 1 1/2 in (38.1 mm).

Make the slope through the thickness

The 10° end slope crosses the 1 1/2 in (38.1 mm) thickness. With the broad face safely supported flat on the saw bed, this is a bevel cut. Follow the saw maker's setup and clamping directions; do not cut a diagonal across the broad face by mistake.

Mark parallel and opposing ends

For A, the two slopes lean the same way, making a parallelogram in the side profile. For B, C and D, reverse the end slope to make a shallow trapezoid. Mark the long points before measuring the finished length.

Test before repeating

Cut scrap first and check the finished angle. Dry-fit one A pair with B and C. The leg tops must share one plane and the feet must rest flat. Compare matching parts before using them as patterns for the second frame.

Do not force the fit

An open angled joint means the cut or orientation needs correction. Do not use a screw to bend a rail into contact. Keep blade kerf on the waste side and make the final cut only after checking the marked points.

STEP 01 / END FRAMES

Build two matching leg sets

A × 4 / B × 2 / C × 2

Build two matching leg sets · Homestead Coffee Table

Dry-fit the first frame

Repeat without changing the shape

Use two A legs with one B upper rail and one C lower rail. Keep B flush with the leg tops. Fit C lower down where its angled ends contact both legs fully; its specified length sets its position. Keep both rails level and their broad faces horizontal.

Make the second frame match the first. Compare the leg spread and rail heights on a flat surface. The two diagonals of each trapezoidal frame should match. Keep the 3 1/2 in (88.9 mm) board depths aligned.

BEFORE FASTENING

Let the fitted rails determine their height; do not trim the legs to force an exact 16 in overall height. Dry-fit the specified parts, then match both assemblies before drilling.

STEP 01 / CONCEALED JOINERY

Fasten the frame joints

Complete all four rail-to-leg joints in each frame before adding the mounting plates. Use the same fastening method for both frames.

Prepare the pocket holes

Set the jig and stop collar for the actual 1 1/2 in (38.1 mm) stock. Drill pockets in the rail ends, not through the visible outside faces of the legs. Place upper-rail pockets on top, where the mounting plate will hide them; place lower-rail pockets underneath.

Check the angled joint on scrap

Use an offcut with the same end slope. Confirm the screw exits into sound leg material and seats without breaking through. Keep the pockets clear of edges and each other; use the jig maker's spacing for this joint and stock.

Clamp and drive

Clamp each rail against both legs so it cannot slide. Drive 2 1/2 in (63.5 mm) pocket-hole screws until the joints close snugly. Do not substitute ordinary countersunk screws in the pockets. Recheck frame shape after each joint.

Alternative visible screw route

If not using a pocket-hole jig, the frame can be joined with 2 1/2 in (63.5 mm) self-tapping wood screws through the leg faces into the rail ends. Predrill and test the path on scrap; keep heads flush and avoid split rail ends.

Check both finished frames

Stand them on a flat surface. All feet should bear evenly, the top edges should be coplanar and corresponding rails should match. Correct a loose or split joint now; later parts must not pull a twisted frame straight.

STEP 02 / TOP SUPPORTS

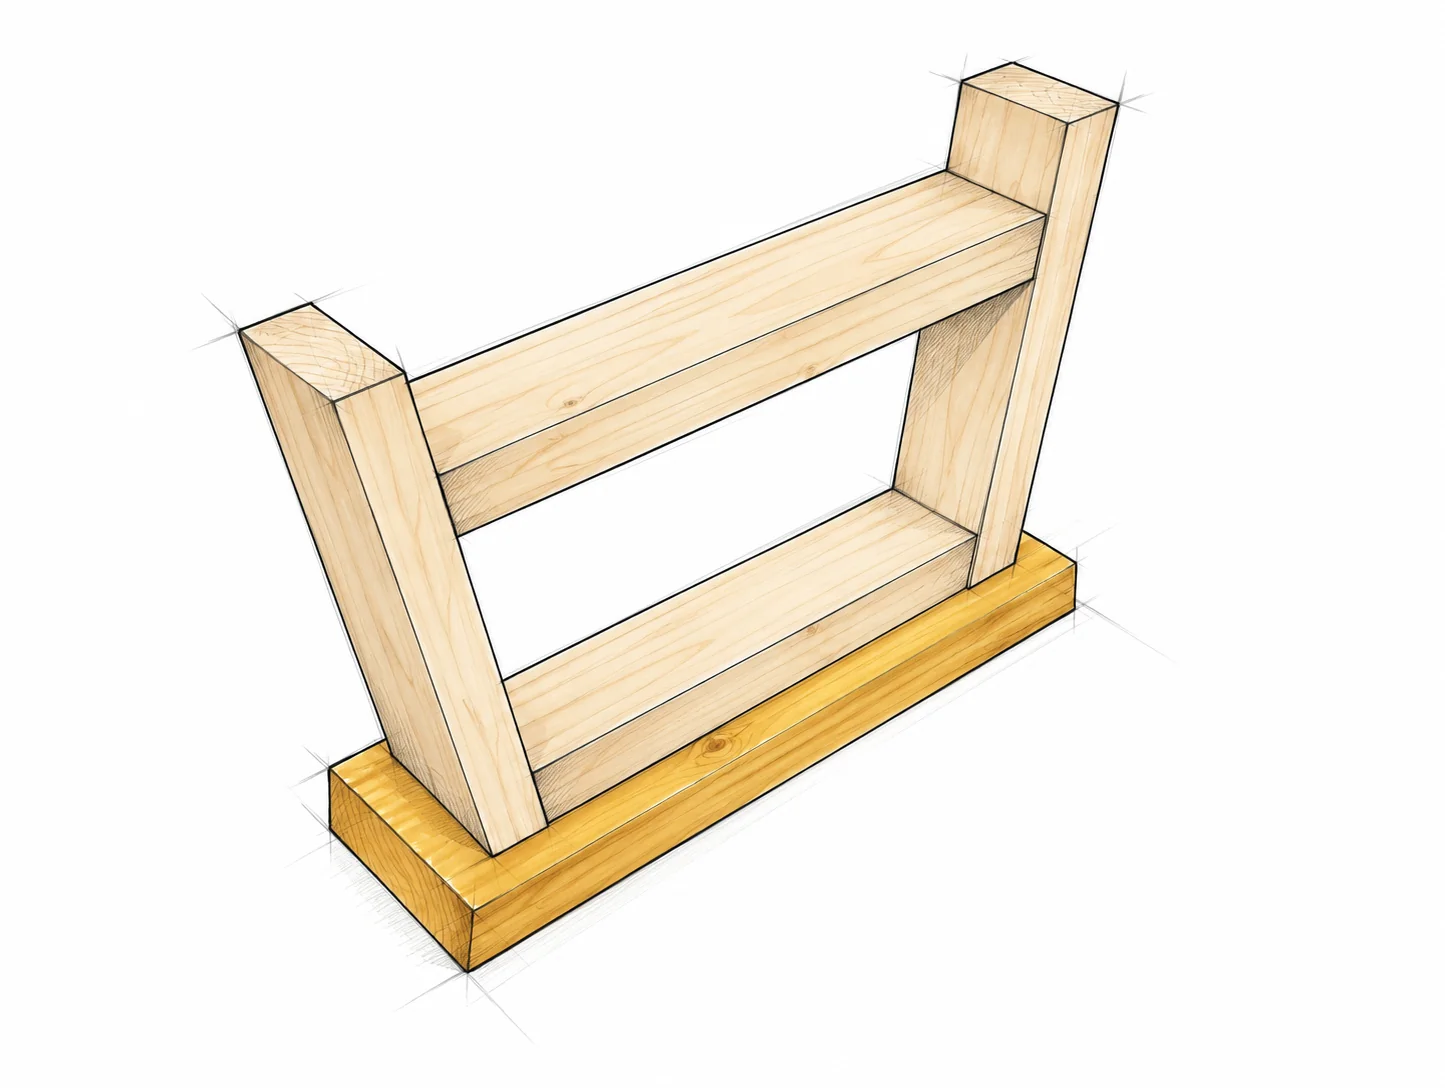
Add the mounting plates

D × 2 / One plate per completed end frame

Add the mounting plates · Homestead Coffee Table

Place the frame upside down

Glue and screw the joint

Lay D with its longer face down on a protected bench. Place the inverted frame on its shorter face, with B and the leg tops against it. Center the frame across the plate length and across its 5 1/2 in (139.7 mm) width.

Dry-fit, glue the contact faces and clamp. Support the assembly on its side to drill through D into B and the leg tops. Fasten with 2 1/2 in (63.5 mm) self-tapping screws. Keep heads flush on the plate face that meets the top.

BEFORE YOU CONTINUE

Repeat for the other frame. Mark plate-to-frame screw positions so the later top-attachment screws will not collide with them. Let the glue cure as directed.

STEP 03 / TABLETOP

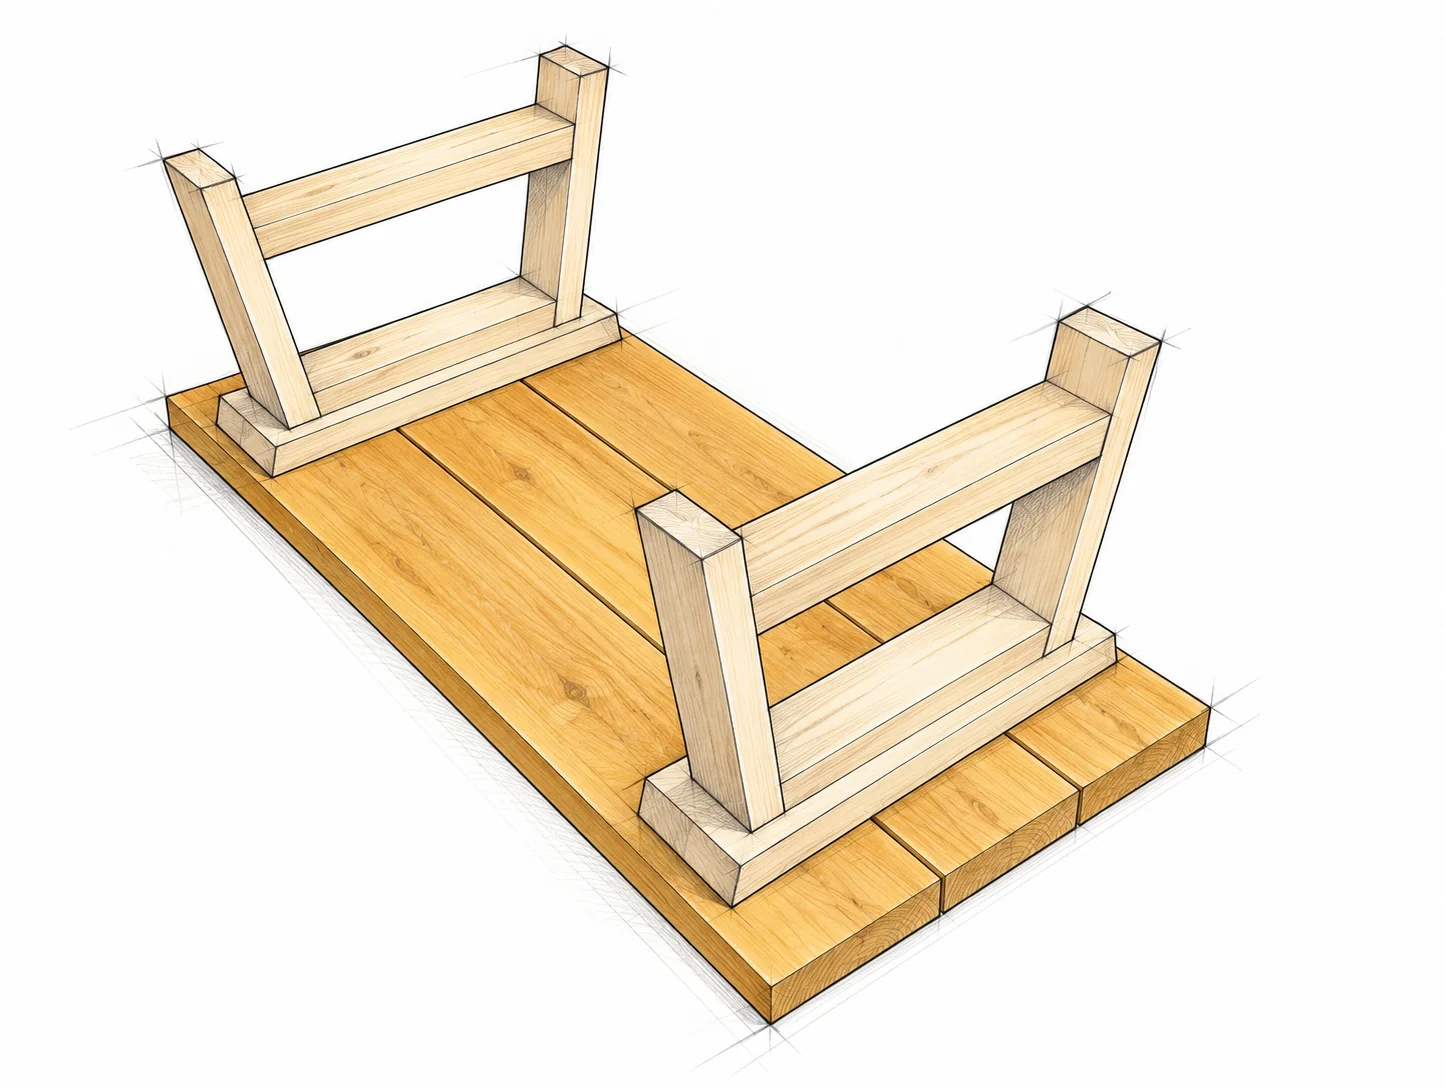
Attach the three top planks

E × 3 / Two complete end frames / Work upside down

Attach the three top planks · Homestead Coffee Table

Align the top and supports

Fasten from underneath

Lay E face down, edge to edge, with all ends aligned. Do not glue or pocket-join their long edges. Place the inverted frames across them. Set each mounting plate's outer edge 4 in (101.6 mm) from its tabletop end and center it across the width.

Clamp the boards flat. Fasten through the exposed plate margins into each E plank with 2 1/2 in (63.5 mm) self-tapping screws. Avoid earlier screws. A flush head through a 1 1/2 in plate enters the top about 1 in (25.4 mm); do not deeply countersink.

BEFORE YOU CONTINUE

Test screw penetration on scrap first. Use the 1 1/2 in (38.1 mm) thick 2×8 top only. The screw length shown is not suitable for a thin 1× top. Do not glue the top to the plates.

STEP 04 / LOWER SHELF

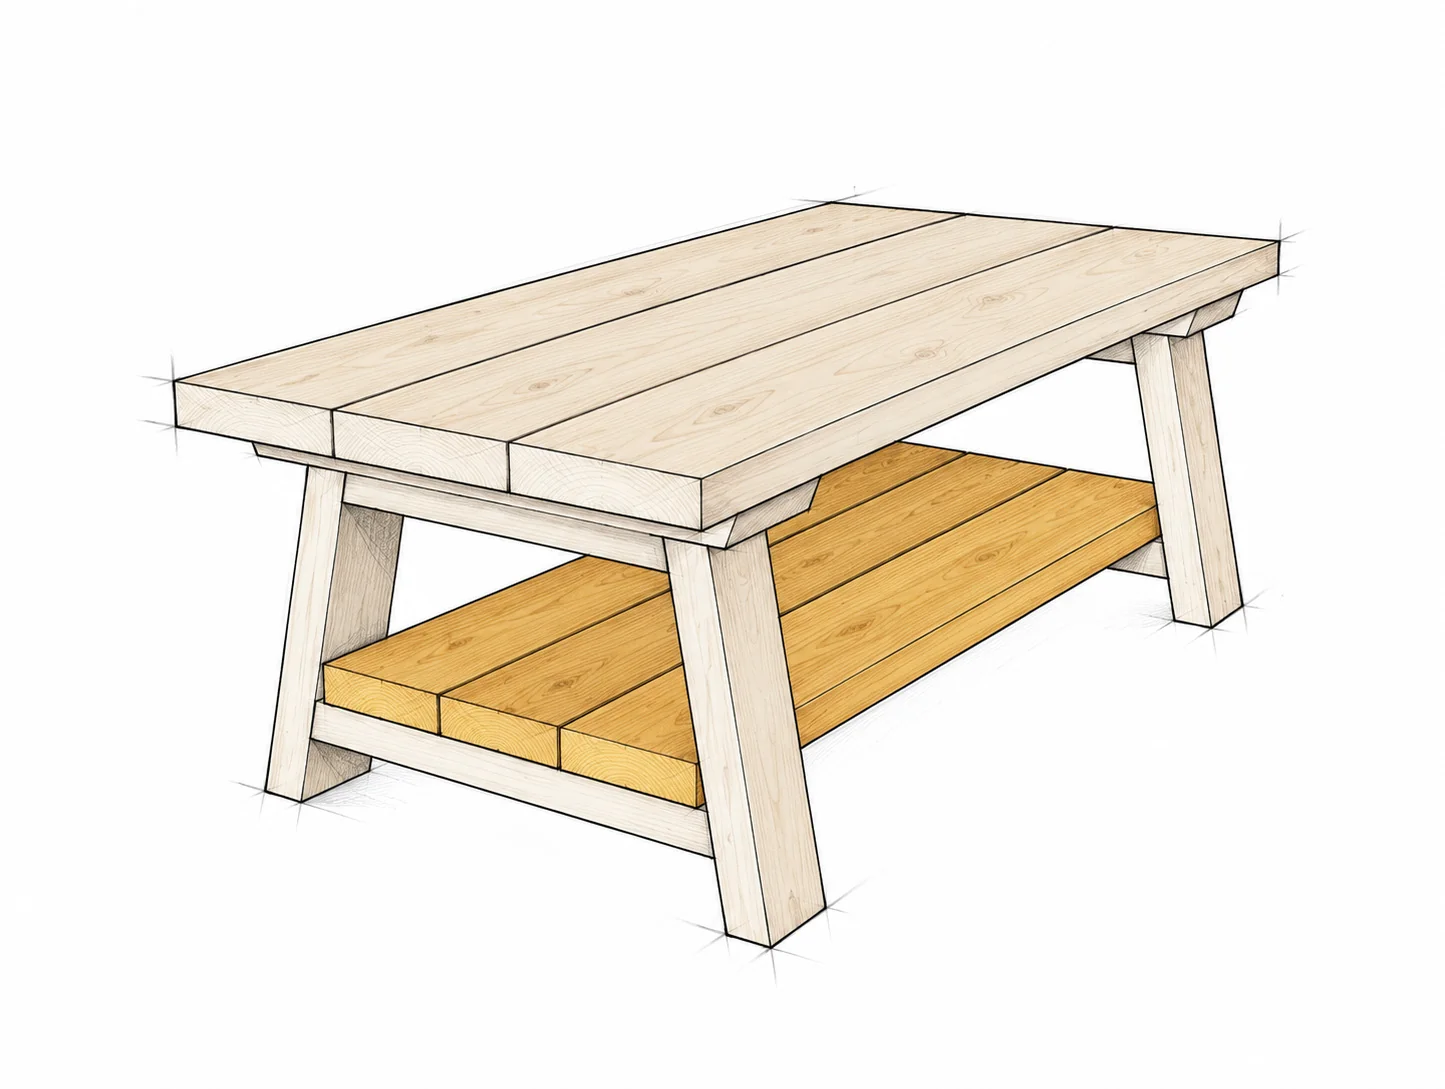
Fit the three shelf planks

F × 3 / Attach from below through the lower rails

Fit the three shelf planks · Homestead Coffee Table

Dry-fit the shelf

Secure each plank

With help, turn the table upright. Set the three F planks edge to edge on the lower rails C. Keep their ends aligned and center the 38 in (965.2 mm) shelf along the table. Each plank must bear on both lower rails without rocking.

Clamp the shelf in position. Drive 2 1/2 in (63.5 mm) self-tapping screws upward through C into each plank. Keep heads flush and clear of the frame pocket screws. Test depth first: 1 1/2 in rail plus 1 1/2 in shelf gives 3 in (76.2 mm) total wood.

BEFORE YOU CONTINUE

Leave the shelf plank edges unglued. Do not force the shelf against the splayed legs or use it to correct a twisted frame. Check for split ends and exposed screw points.

FINISH AND INSPECT

Make it ready for use

Keep this table indoors. The sketches show a warm natural finish, but the color is optional. No tested load capacity is specified.

Prepare the surface

Inspect all joints and fasteners. Ease sharp exposed edges without rounding joint faces. Sand with the grain, then remove dust with a vacuum and a suitable lint-free cloth. Test the complete finish on an offcut.

Choose paint or stain

For paint, fill visible holes if desired, sand smooth and apply a compatible primer and topcoats. For stain, stain first and use color-matched filler afterward if needed. Protect stained wood with a compatible clear topcoat.

Let the finish cure

Follow the product maker's ventilation, protective-equipment, drying and full-cure directions. Treat all accessible surfaces consistently. Store and dispose of oily rags as instructed; do not leave them crumpled in a pile.

Inspect on a level floor

Check that all four feet contact the floor, the top and shelf do not rock, every joint is secure and no sharp screw tip projects. Correct the cause of any rocking rather than tightening a screw until the wood bends.

Use and care

Use as a coffee table, not a seat, step or climbing surface. Do not drag it by the top. Wipe spills promptly and check periodically for looseness, splits or movement. Stop using it until any damage is repaired.

MAKE IT YOURS

Measure your own stock and dry-fit before fastening. If you make this project, I would love to see what you built.

Share your build