WOODWORKING · DIY · A HANDMADE HOME @grainbyjoy
GRAIN by JoyWOODWORKING PLANS · WORKSHOP STORIES · HOME
FIND YOUR NEXT GOOD THING
WOODWORKING PLANPullout Bin Kitchen Island
WOODWORKING PLANFarmhouse Media Console
WOODWORKING PLANRound Coffee Table
WOODWORKING PLANGeometric Hairpin Coffee Table
WOODWORKING PLANHollow Panel Waterfall Console
WOODWORKING PLANFarmhouse Console Table
WOODWORKING PLANBarn Door Console
WOODWORKING PLANBeginner Farm Table
WOODWORKING PLANFarmhouse Coffee Table
FREE WOODWORKING PLAN
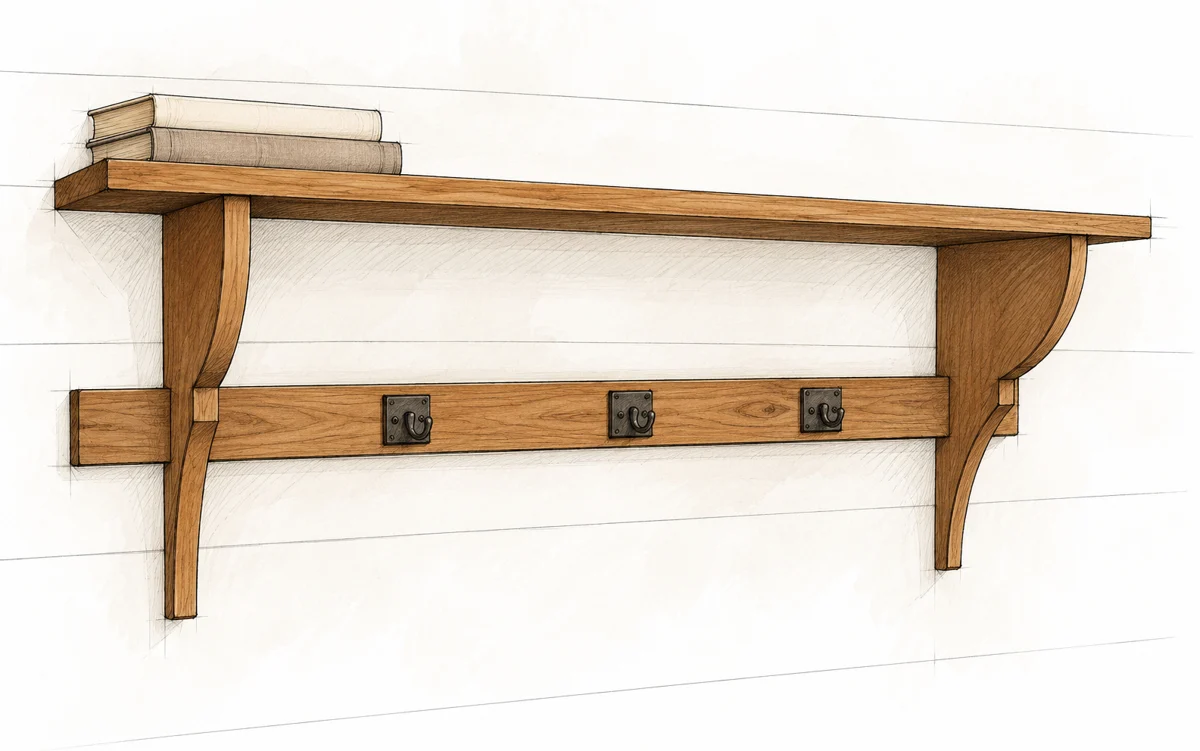
Shelves / BEGINNER

Vintage Shelf with Hooks

A wall shelf with curved corbels and three useful hooks.

FINISHED DIMENSIONS36 × 7 1/4 × 14 1/4 in
SKILL LEVELBeginner
WHAT IS INCLUDEDMaterials, cut list and illustrated steps
Read the free planMade this plan? Share your build
A GOOD BUILD STARTS WITH A CLEAR PLAN
  • Materials and tools
  • Cutting information and dimensions
  • Illustrated assembly steps
FROM THE FIRST CUT TO THE LAST DETAIL

Take it one step at a time

Everything you need to follow this build is written below. Read the materials, measurements and construction notes before your first cut.

Read the build steps

Yes. The complete plan is available to read on this page.
THE FREE BUILD GUIDE

Vintage Shelf with Hooks

A wall shelf with curved corbels and three useful hooks.

BEFORE THE FIRST CUT

Materials

Choose straight, dry boards. Avoid loose knots, cracks and defects where the corbels narrow or fasteners enter.

QuantityItemSize or requirement
1 boardNominal 1×86 ft / 72 in 1828.8 mm long
1 boardNominal 1×33 ft / 36 in 914.4 mm usable length
3Coat hooksMounting screws suitable for 3/4 in / 19.1 mm wood

Choose the assembly fasteners

Use 2 in (50.8 mm) self-tapping star-drive wood screws and wood glue. Alternatively, use 1 1/4 in (31.8 mm) brad nails with glue. Fastener gauge and total quantity are not specified; select compatible products and keep spares.

Optional concealed top connection

The Step 2 sketch shows pocket holes. For that option, use a pocket-hole jig set for 3/4 in (19.1 mm) stock and 1 1/4 in (31.8 mm) pocket screws. The jig is not needed for the straight-screw or brad route.

Supplies and wall fixings

Add abrasives, filler if needed and a compatible interior finish. Wall screws or anchors are separate from assembly screws. Choose them for the actual wall, fixing positions and intended use before installation.

SET UP THE WORKSHOP

Tools and preparation

Read the whole guide before cutting. The decorative curves are drawn and cut by hand; the joints use measured straight reference lines.

Basic tools

Tape measure, square, pencil, safety glasses, drill and driver, jigsaw and sander. Use a suitable fine-cut wood blade and drill bits matched to your selected screws.

Useful setup equipment

Clamps, a stable workbench, scrap backing, a straightedge, sanding block and dust collection. Use hearing and appropriate dust protection. A level and a suitable wall-structure detector help at installation.

Tools for optional fastening

Use a brad nailer only if choosing the brad-and-glue route. Use a pocket-hole jig and its matched bit and stop collar only if choosing the concealed Step 2 connection.

Cut and drill safely

Clamp the work with the blade path clear below it. Support long boards and keep hands outside the tool maker's danger zone. Let the jigsaw stop before lifting it from a cut. Disconnect power before changing blades or making adjustments.

Make a small test joint

Use offcuts of the same thickness to check screw length, pilot hole, countersink and driver setting. Stop before a head crushes the surface or a point breaks through. Measure real stock rather than scaling the sketches.

PARTS A TO C

Cut list

All lengths are finished lengths. Mark each piece before cutting; keep the two support blanks together as a matched pair.

PartQtyStockLength inmmUse
A21×813 1/2342.9Corbel blanks
B11×836914.4Top shelf
C11×336914.4Hook rail

Lay out the 1×8 before cutting

The 6 ft board supplies B and both A blanks: 36 + 13 1/2 + 13 1/2 = 63 in (1600.2 mm). That leaves 9 in (228.6 mm) before saw kerfs and end trimming. Mark the waste side and allow for the actual blade width.

Check the exact-length rail stock

The rail needs a sound, square-ended usable 36 in (914.4 mm). A board already supplied accurately at that length needs no crosscut. If either end needs trimming, purchase a longer piece rather than making the finished rail short.

Shape A after crosscutting

Keep both A blanks rectangular until the profile is marked. Draw the first corbel, cut and sand it, then use it to trace the second. Do not stack-cut the pair with the jigsaw.

MEASURE THE WOOD YOU HAVE

Sizes and layout checks

Nominal labels are shopping names. These typical dry, surfaced sizes determine the fit; verify the boards you buy.

NominalActual cross section inActual cross section mm
1×83/4 × 7 1/419.1 × 184.2
1×33/4 × 2 1/219.1 × 63.5

Full assembled size

Width is 36 in (914.4 mm); depth is 7 1/4 in (184.2 mm). Height is 14 1/4 in (362.0 mm), calculated from the 13 1/2 in (342.9 mm) support plus the 3/4 in (19.1 mm) top thickness.

Support placement

Mark the underside of B 3 in (76.2 mm) from each end. Align each corbel's outer face to its line, so the top projects 3 in beyond it. With 3/4 in thick supports, the clear opening between them is 28 1/2 in (723.9 mm).

Flush rear edges

Keep the straight rear edges of both corbels aligned with the top's rear edge. The 3/4 in deep rear notches receive the 3/4 in thick rail, leaving its rear face flush for wall contact. Rail and top ends align.

1 in = 25.4 mm. Metric values are rounded half up to 0.1 mm. Use one unit system throughout the build; do not add rounded conversions to set out a joint.

STEP 01 / PROFILE LAYOUT

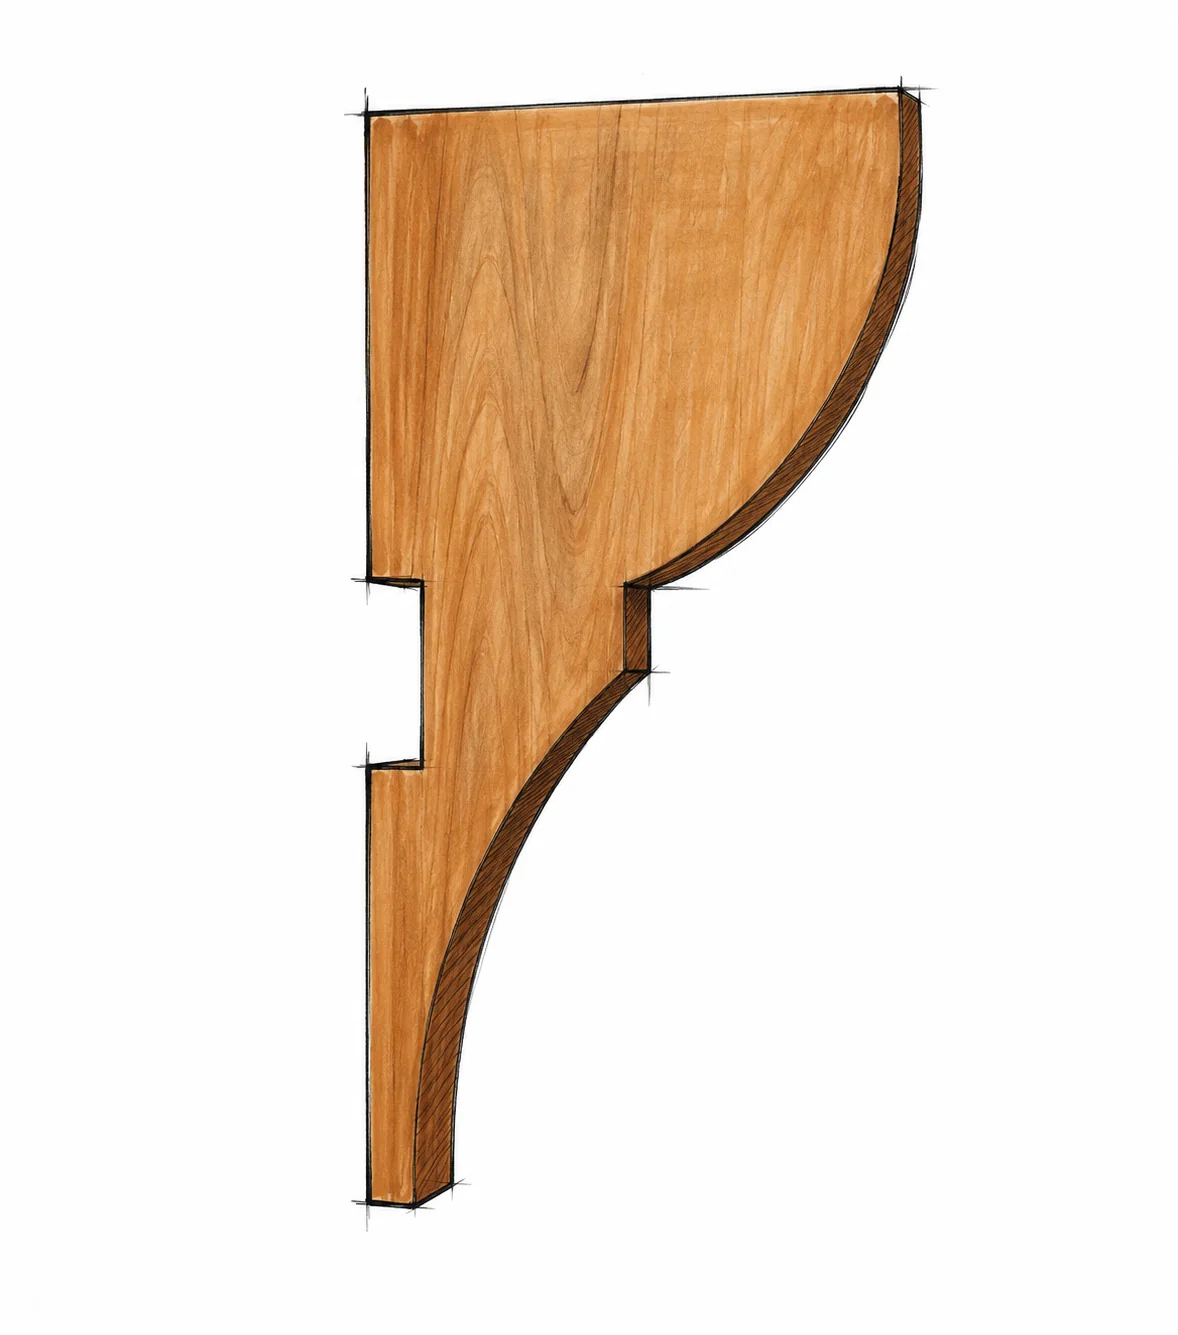
Mark the corbel profile

A × 2 / Use the first finished support as the second pattern

Mark the corbel profile · Vintage Shelf with Hooks

Begin with the blank

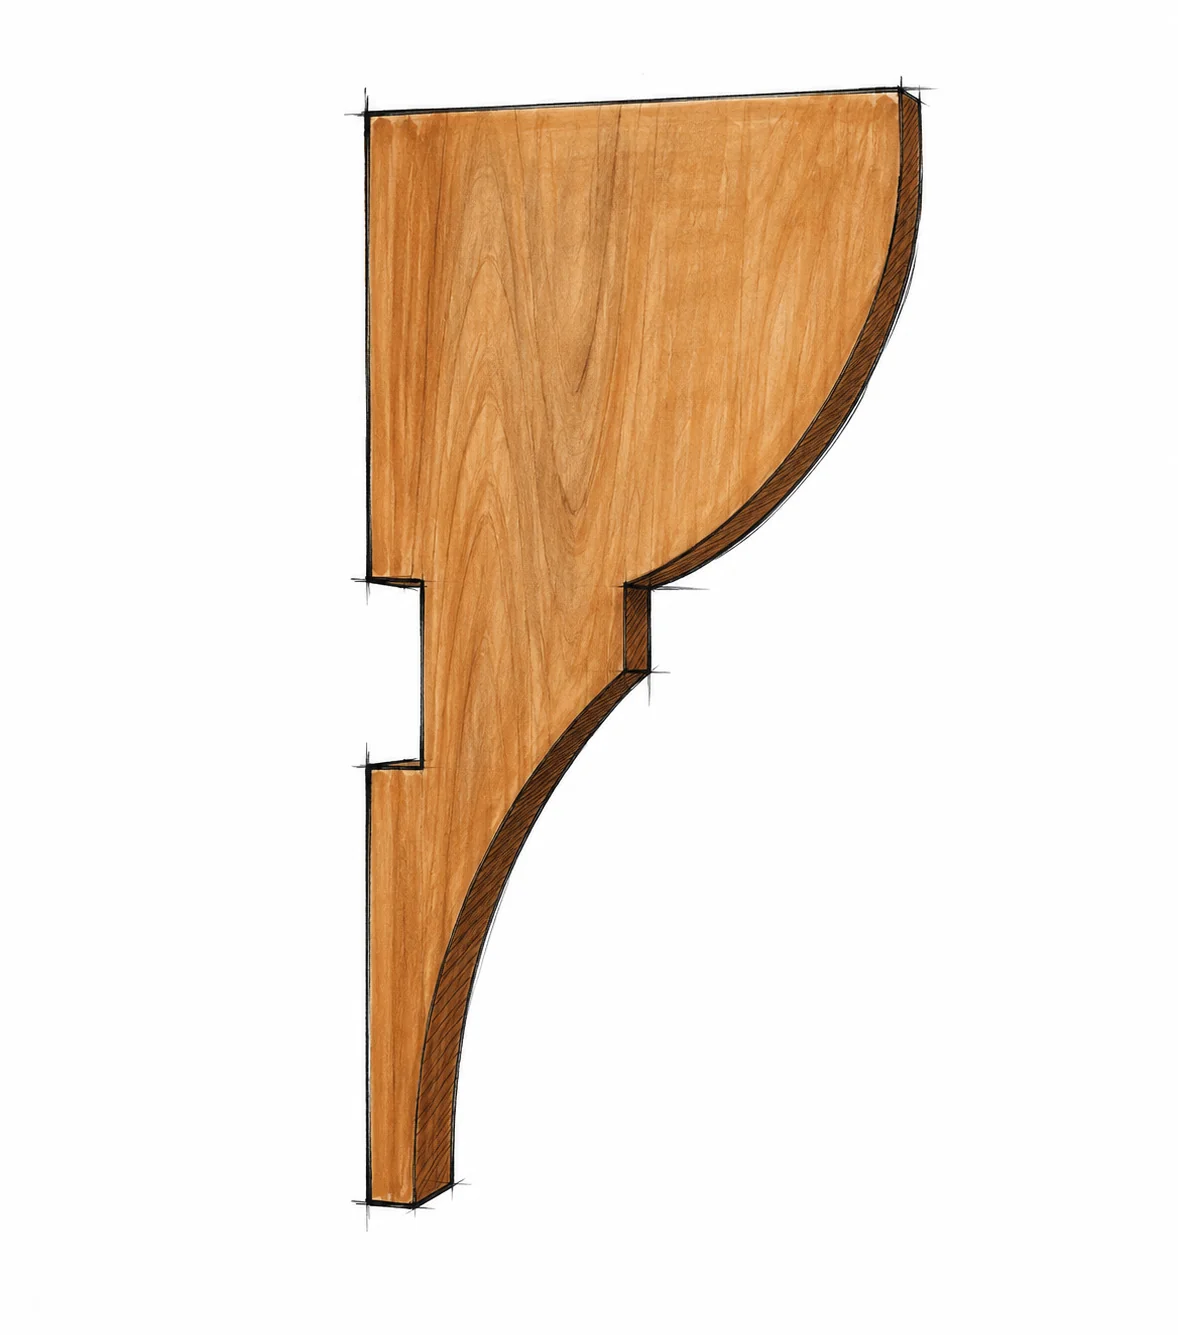
The top is 7 1/4 in (184.2 mm) deep. Overall support height is 13 1/2 in (342.9 mm). Keep the top edge square to the straight rear edge.

Mark the rear notch

Measure 5 in (127.0 mm) up from the bottom for the notch's lower edge. Make it 2 1/2 in (63.5 mm) high and 3/4 in (19.1 mm) deep. Check its fit against C.

Locate the front shoulder

Its lower corner is 6 1/2 in (165.1 mm) above the bottom. The short upright shoulder is 1 in (25.4 mm) high. Connect it to the top and foot with smooth curves.

SHAPE VERSUS FIT

The curves are decorative, not fixed-radius arcs. Follow the illustrated form, keep the measured joint surfaces intact and make both supports match. This sketch is not a full-size cutting template.

STEP 01 / CUTTING

Cut two matching supports

A × 2 / Work on one blank at a time

Cut two matching supports · Vintage Shelf with Hooks

Cut the first profile

Clamp the blank securely, with room below for the blade. Cut slowly just outside the pencil line. Keep the jigsaw shoe flat and do not twist the blade to force a tight turn.

Refine and test the notch

Sand the curved edges smooth. Keep the top and rear joint faces square. Test a piece of the actual rail in the notch; it should seat without force or a loose gap.

Trace the second support

Place the finished first support on the second blank and trace around it. Cut the second separately, then sand to match. Compare the two profiles and notch positions.

BEFORE YOU CONTINUE

The top edges must sit flat against the shelf. Check that both rear edges are straight, both notches match and neither narrow foot has a crack or weak knot.

STEP 02 / ASSEMBLY

Join the supports to the top

A × 2 / B × 1 / Assembly shown upside down

Join the supports to the top · Vintage Shelf with Hooks

Position and clamp

Choose one fastening route

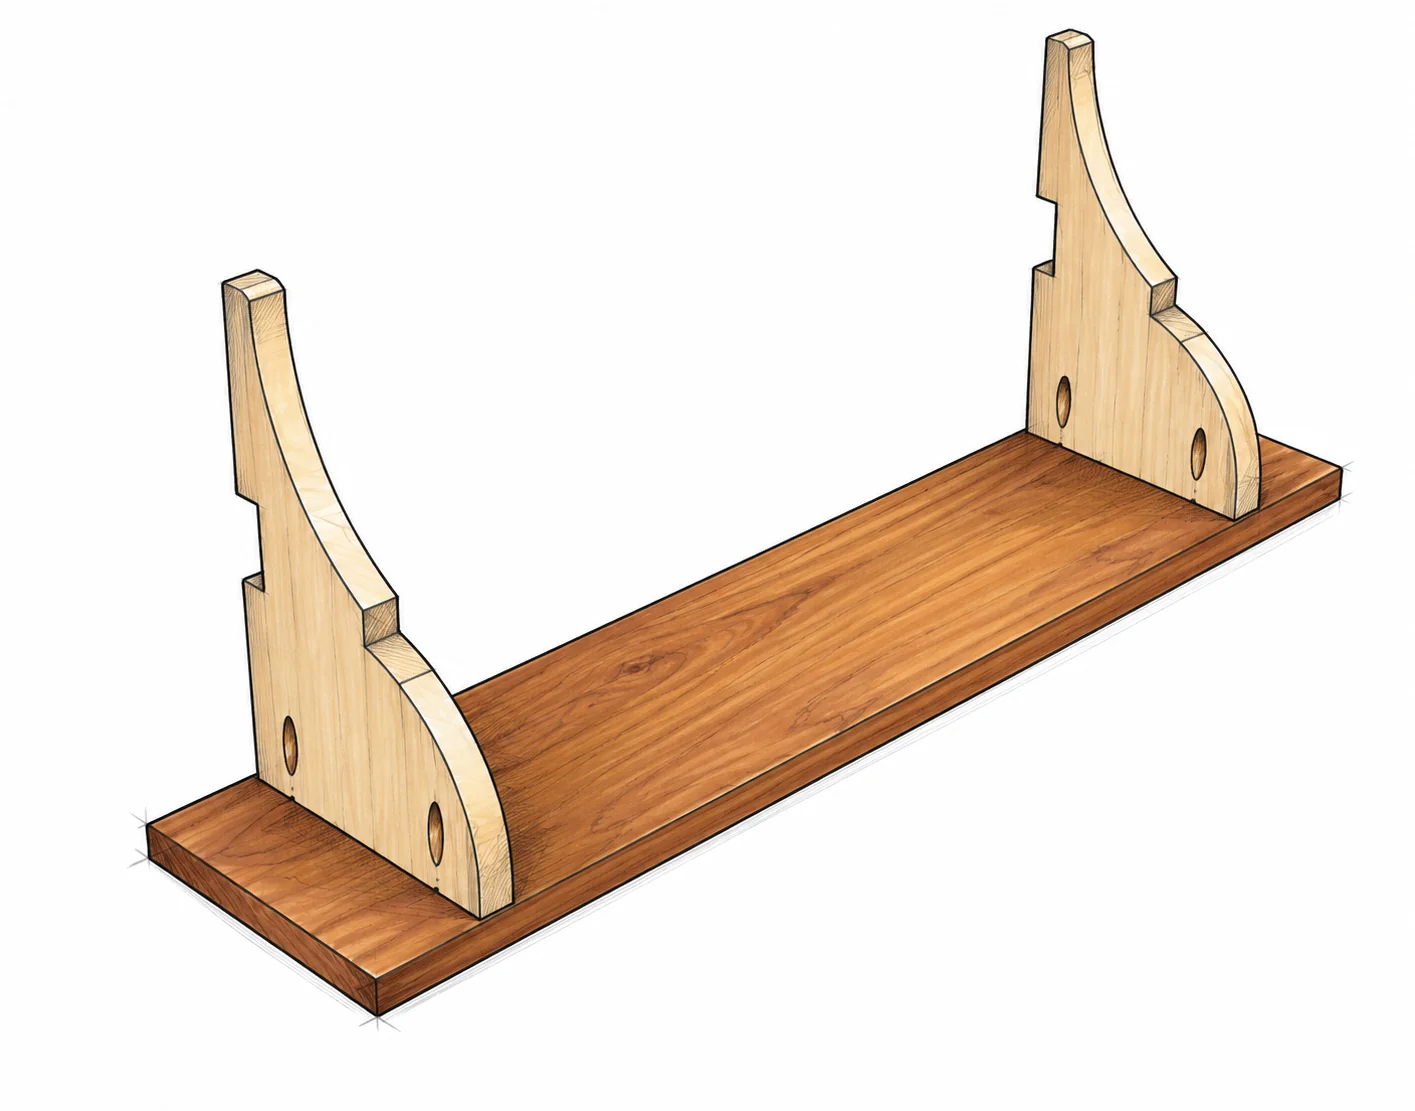
Lay B face down on a protected bench. Mark 3 in (76.2 mm) from each end and align the corbels' outer faces to the marks. Keep their rear edges flush with B and their faces square to the top.

For straight screws, predrill through B into each corbel's top edge; glue and fasten with 2 in (50.8 mm) screws. Or use the illustrated inward pocket holes: 3/4 in jig setting and 1 1/4 in (31.8 mm) pocket screws.

BEFORE YOU CONTINUE

Pocket holes in the sketch show an optional concealed route. Do not add every fastening method. Keep both supports square while the chosen joints set.

STEP 03 / ASSEMBLY

Fit the full width hook rail

C × 1 / The rail seats in both rear notches

Fit the full width hook rail · Vintage Shelf with Hooks

Dry-fit the rail

Clamp and attach

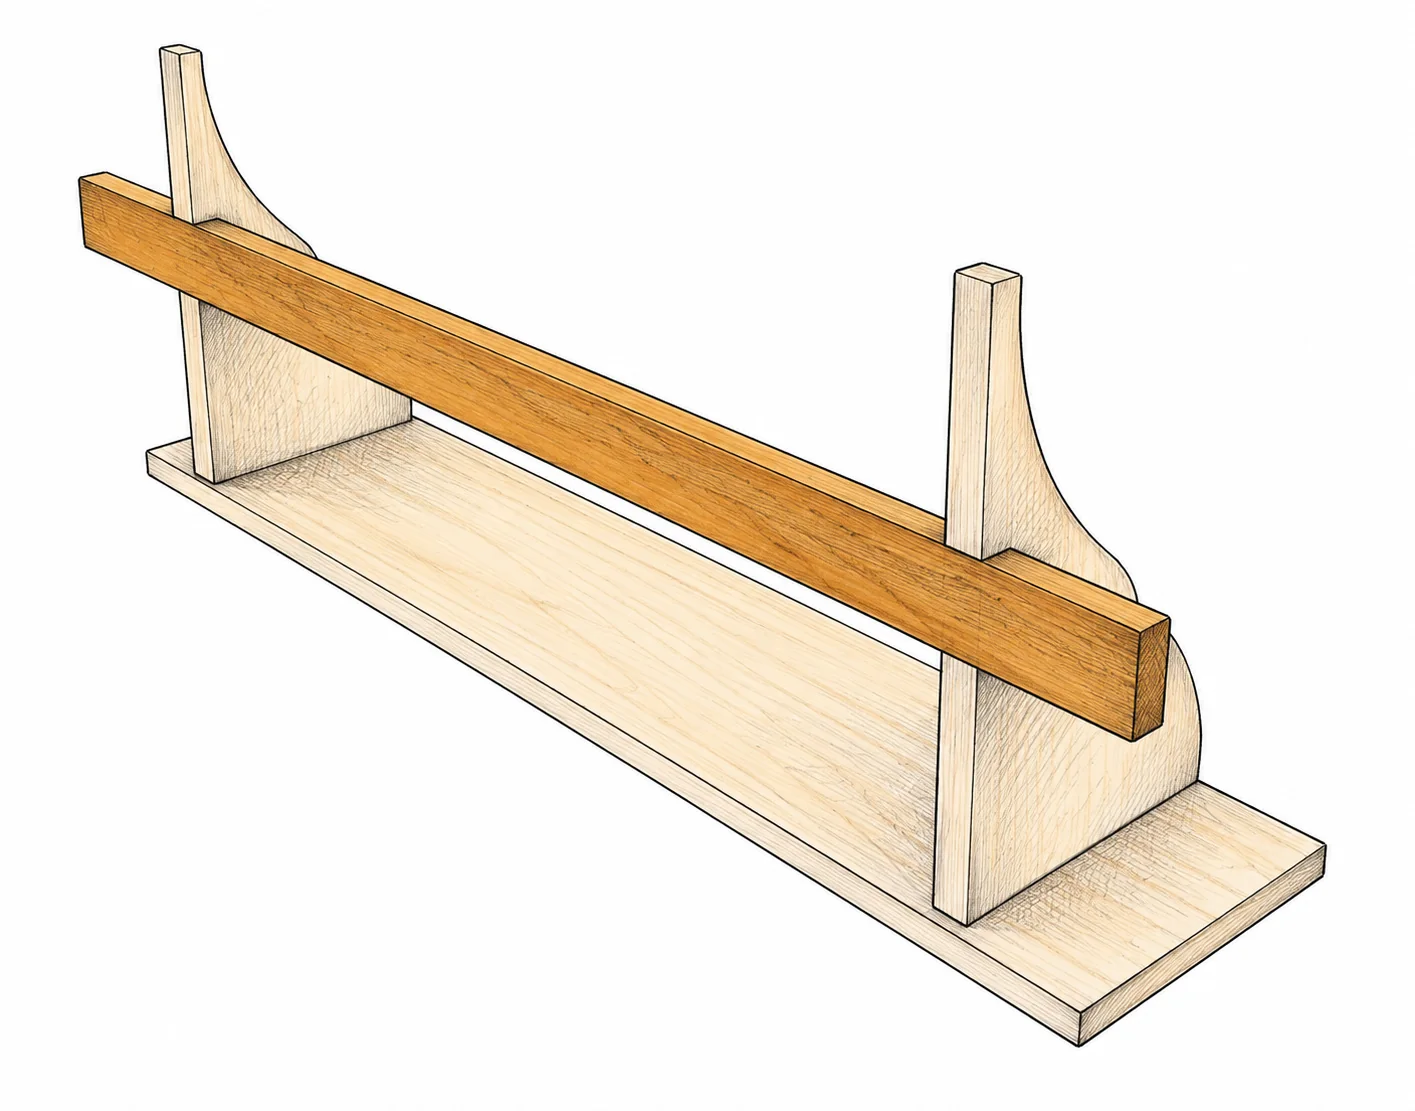
Keep the shelf upside down. Place C into both notches with its broad face vertical. Align its ends with the ends of B; each projects 3 in (76.2 mm) past the adjacent corbel's outer face.

Check that the rail's rear face is flush with the corbel backs. Apply glue at the joints, predrill and use 2 in (50.8 mm) self-tapping screws through the rail into the supports. The alternative is 1 1/4 in (31.8 mm) brads with glue.

BEFORE YOU CONTINUE

Check the screw path against the shaped support before drilling. Keep the rail straight and the assembly square; do not pull a poorly fitted notch into place with a screw.

STEP 04 / HARDWARE

Lay out the three hooks

3 hooks / Fix to the 1×3 rail after finishing

Lay out the three hooks · Vintage Shelf with Hooks

Plan fixing positions first

Fit suitable hook screws

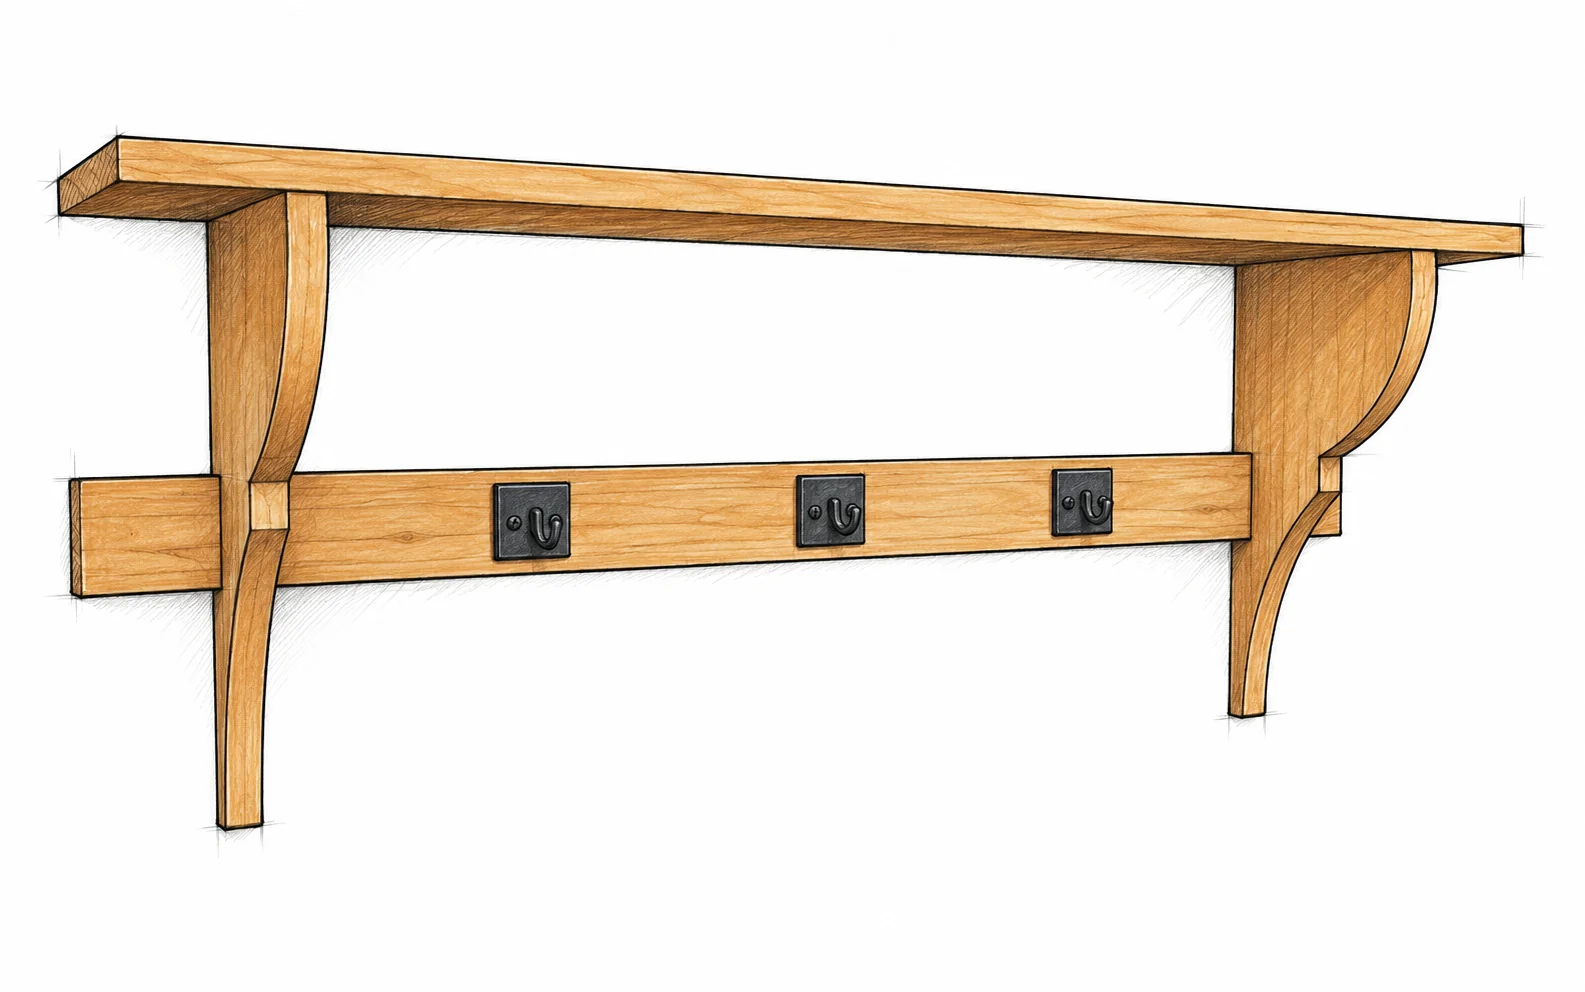
Turn the shelf upright. Arrange three hooks on C and mark their actual mounting holes. Keep them clear of corbel joints and assembly screws. Hook spacing is not fixed; coordinate it with safe wall-fixing access.

After the finish cures and the wall fixings are installed, attach the hooks with their specified screws for 3/4 in (19.1 mm) wood. Predrill to the hardware instructions, limit hole depth and check that points do not project at the rear.

BEFORE YOU CONTINUE

Hook screws are not wall anchors. If a hook plate will conceal a wall screw, confirm the positions do not collide and leave access until the shelf is securely mounted.

BEFORE HANGING

Finish the wood

Finish the shelf before fitting the hooks permanently. The warm natural wood in the sketches is a finish option, not a material specification.

Prepare the assembly

Check joints for gaps, cracks and projecting fasteners. Ease sharp edges without changing the joint surfaces. Sand with the grain, then remove dust thoroughly. Do not round the flat rear surfaces needed for wall contact.

For paint

Fill visible holes if desired and allow the filler to dry. Sand smooth, remove dust and apply a compatible primer if required. Apply even coats, allowing each coat to dry according to its instructions.

For stain or clear finish

Test the full finish on an offcut. Stain can reveal glue residue and absorb unevenly in filler. Wipe excess as directed, then apply a compatible protective clear coat. Match filler afterward if needed.

Cure and handle safely

Follow the coating maker's ventilation, protective-equipment, drying and full-cure guidance. Store and dispose of used rags as instructed. Keep the shelf off the wall until the finish and glue have cured.

Inspect before installation

Confirm the two supports, the top and the rail are secure. Check that rear faces lie in one plane. Correct any loose or split joint before hanging; a wall fixing cannot repair a weak assembly.

INSTALL AND INSPECT

Secure it to the wall

Wall construction determines the fixings. No universal anchor, wall-screw length or tested load rating is specified for this shelf.

Identify suitable structure

Choose the location and check for concealed wiring or pipes before drilling. Find suitable solid structure or select a rated anchor system appropriate to the actual wall and intended use. If uncertain, ask a competent installer to choose and fit it.

Mark and drill carefully

With help, hold the shelf level and mark suitable fixing positions through the rear rail. Avoid assembly and hook screws. Set the shelf down to drill; follow the selected fixing maker's hole diameter, depth and installation directions.

Secure before covering the screws

Use fixings that pass through the wood and engage the selected wall structure or anchors as instructed. Check that the rear faces contact the wall without distorting the shelf. Conceal screw heads with hook plates only when their positions safely align.

Check the finished shelf

Confirm there is no looseness or movement at the wall, top, supports, rail or hooks. Fit the hooks and inspect for exposed points. No safe load can be inferred from the illustration; do not hang from, climb on or overload the shelf.

Keep it in good condition

Recheck fixings and joints periodically. Stop using the shelf if it shifts, cracks or loosens. Wipe spills promptly and keep the finish dry. Repair the cause before returning items to the shelf.

MAKE IT YOURS

Measure your own stock and dry-fit before fastening. If you make this project, I would love to see what you built.

Share your build